Do you still have an ancient prodigy.net or aol.com email address that you are finally giving up? Or maybe you’ve been using a college or university email address for several years and want to move to a permanent email address before you graduate? Or maybe when you signed up for Internet service, you ended up using an ISP email address like cox.net or comcast.net?
Whatever the situation may be, switching to a new email address is non-trivial, especially if you have thousands of emails you want to retain at your new email service provider.
If you don’t have the time to do it yourself, you can use a service I wrote about earlier called YippieMove that charges a $15 fee, but will transfer all of your email from one service provider to another, like Hotmail to Gmail or Yahoo Mail to Gmail, etc.
While I think that method is worth it for some people, most people can do it themselves and configure everything the way they want. In this article, I am going to talk about moving from any email service provider to Gmail or Outlook, since those are probably the best two at this time.
Here is the general outline of what needs to be done in order to move yourself from one email service to another:
- Setup new email with Gmail or Outlook
- Import old email to new email service
- Forward email from old to new provider
- Setup rule to automatically reply to old email address
- Email all contacts with the new email address
- Update all online accounts that used old email address
Setup New Email Account
When setting up a new email account, you need to make sure that you choose two things right: the email provider and your email address. Don’t pick an email provider that might be gone in 5 years or that might force you off. That means don’t use an email from a college/university, your Internet Service Provider or your company email.
My suggestions are Gmail and Outlook because they have great features that other service providers can’t match. For example, with a Gmail account, you also have a Google account and therefore can video chat directly from Gmail. Google also has Google Now, which can scan your Gmail email automatically and give you information about flights, packages, etc. With Outlook.com, you can use Skype from directly within the web interface.
The second aspect to carefully consider is the name you choose for your email address. These days it’s best to simply use your name, if possible, as your email address. Don’t use awful names like thegrandman2010@gmail.com or shedevillove99@outlook.com. Once you switch to a new email address, you’ll probably want to keep it for a very long time, so pick a good name.
Import Old Email
The next step is to import all your old emails into Gmail or Outlook. This requires POP3 access, which most email providers support nowadays, but if not, you’re probably not going to be able to get all your old email moved over. You can manually go in and forward emails, but probably only the important stuff.
If all of your email is in the desktop version of Outlook, you can import your entire PST file into Gmail by adding your Gmail account to Outlook using IMAP and then simply dragging and dropping the local folders to the Gmail folders in Outlook. Check out this detailed guide for step by step instructions.
Now if your email provider supports POP3 access, it’s really easy to get your email into Gmail. I’ve already written a detailed guide explaining how to import email into Gmail from different providers.
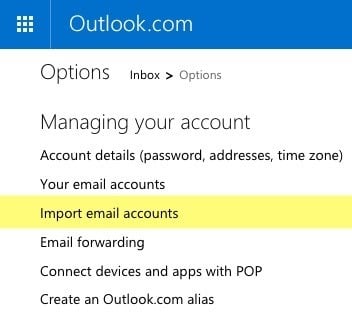
If you’re using Outlook.com, the process is also very easy. Log in, click on the gear icon at the top right and then click on Options. Go ahead and click on Import email accounts.
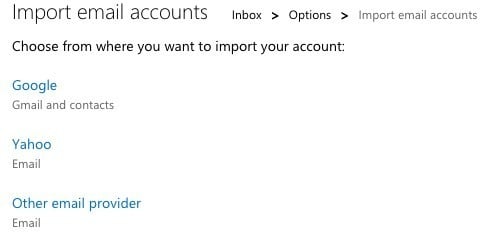
You can pick either from Google, Yahoo or other email service provider. Basically, all you have to do is enter your email address and password to connect to the account. You can also click on Advanced options to enter the email server information manually if your provider uses non-standard ports, etc.
That’s about it for importing old emails into Gmail and Outlook. Note that it can take several days for your old emails to show up if you have thousands of emails that need to be imported.
Forward Old Email
Note that when setting up email import in Gmail and Outlook.com, new emails arriving at your old email address will most likely be imported automatically, so you don’t have to setup forwarding. In the case of Gmail, it will only import new emails for 30 days, after which point you have to manually turn on auto-forwarding on the old email.
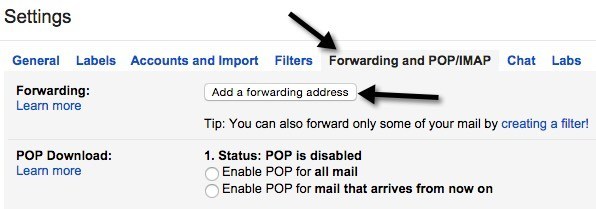
If you are leaving Gmail, you can enable forwarding easily by going to Settings and then clicking on the Forwarding and POP/IMAP tab.
Click the Add a forwarding address button and enter your new email address. If you don’t want everything forwarded, click on the creating a filter link below the button.
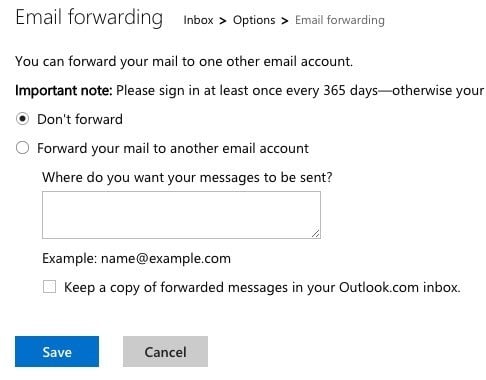
If you are leaving Outlook.com, go to Options and then click on Email forwarding to enter the forwarding address.
Again, you only need to do this on your old email provider if you are not seeing new emails being imported into your new email provider.
Setup Auto Reply
Next, you want to go ahead and setup an auto-reply or vacation reply on your old email address that tells everyone this email address will soon be deactivated.
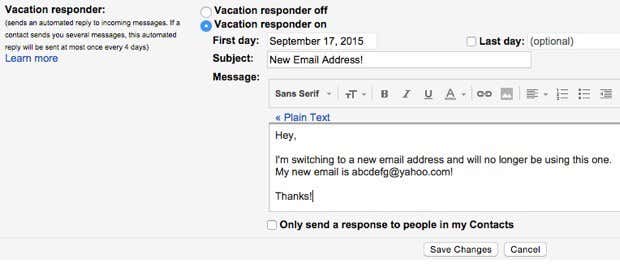
In Gmail, you can do this by going to Settings and then scrolling down to the bottom on the General tab. There you will see the Vacation responder section.
Turn it on, choose a First day, don’t check anything for Last day and then type in a subject and email body. You can also check the box at the bottom if you only want the message sent to your contacts stored in Google.
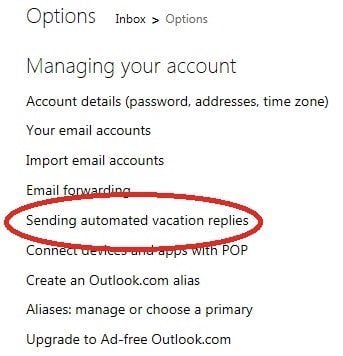
In Outlook.com, go to Options and click on Sending automated vacation replies under Managing Your Account. Note that the option will be missing or turned off if you are not using your Outlook.com account on a daily basis.
On the next screen, you can enter your message just like in Gmail. I would just leave the auto-reply on until you decide to shutdown the account completely.
Update All Online Accounts
This is probably the hardest part of switching to a new email address. Pretty much everything we do online requires an email address as a starting point and that means you have to update many accounts manually.
Unfortunately, there is no easy way around this job. You’ll have to spend several hours or several days going through each site one by one and updating the email address.
If you use a password manager like LastPass or 1Password, you can quickly go through each stored site and update the address. If you don’t have any system for keeping track of your accounts, the next best option is to sift through your email and see which sites are sending emails.
Hopefully, with a bit of planning and organization, you can switch to a new email address and not screw anything up! If you have any questions, feel free to post a comment. Enjoy!

