Looking for some utilities to find duplicate files and photos on your computer quickly and easily? I recently organized all the data that my father had stored on multiple computers and multiple external hard drives into one safe backed up location, but found that there were duplicates of pretty much everything. There was no way I was going to manually try to figure out what was the same and what was a duplicate, so I went ahead and tried out a couple of duplicate finder programs.
In this article, I’ll mention the ones I used and give a short overview of how the program works, its effectiveness and any issues that I ran into. It’s worth noting that you should never completely trust the results of a duplicate finder program because there are always scenarios that can confuse the search algorithms and give you false positives. So always double-check once before you delete anything.
Also, it goes without saying that you should definitely make a backup of all data before you start this process just in case. Once you are certain the correct data was deleted, then you can get rid of the original backup.
NirSoft SearchMyFiles
If you’re looking for some of the most useful software tools for Windows, then NirSoft should be the first place you look. One of their tools is SearchMyFiles, which is basically a super search engine for your local files and folders. It has a ton of filters that let you search by wildcard, by file dates, by file content, by file size, by file attributes, etc.
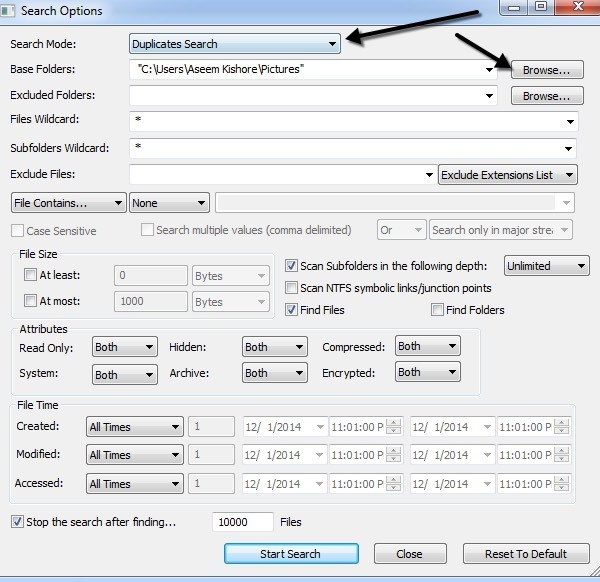
It also has a search mode called Duplicates Search. Once you download and run it (no need to install), just click on the drop down at the very top and change the value to duplicates search.
Next, you choose the base folder where you want the search to start from. As you can see, everything else is self-explanatory. If you’re only looking for duplicate files and want to find all of them, then don’t change any of the filters or settings. By default, they are configured to search everything. If you want to restrict the types of files scanned, then you should use the filters.
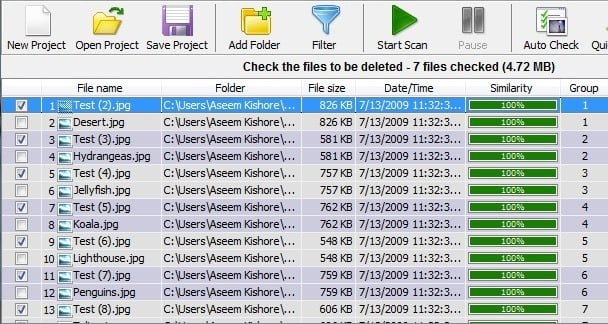
Go ahead and click Start Search and you’ll get the results in a pop up window. I tried my tests on the sample photos included with Windows 7 and it worked fairly well. Even though the file names for the photos were different, it seems to find duplicates based only on size. If they are the exact same size, the files are considered duplicate. When I resized one of the photos, it no longer showed them as duplicates even though it was the same photo, just a different size.
This method of searching is good, but it’s not perfect for photos because there may be times when you have the same photo with two different names or the same photos in different sizes. I also ran into issues with documents that had the same contents and even the same name, but were slightly different in size and therefore didn’t show up in the results. It would have been nice if they also showed files with the same name even if they have different sizes.
It really depends on what your goal is, but I’ll mention other programs that search differently in case this is not what you’re looking for.
Duplicate Cleaner
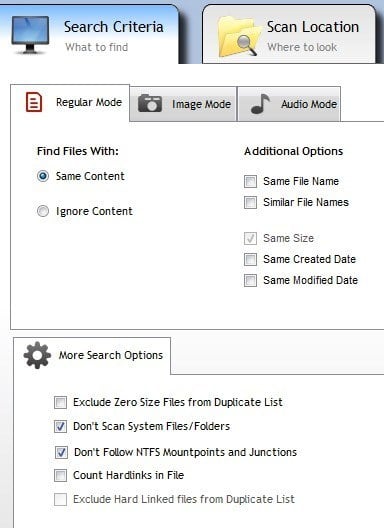
Duplicate Cleaner Free is a bit better than the NirSoft utility because it has more advanced options for the search criteria. Firstly, you have to choose whether you want to find files with the same content or if you want to ignore the content. Then you can also choose options like Same File Name, Similar File Names and Same Size.
Using these criteria, you can perform more complicated searches for duplicates like searching for all files with the same name, but not necessarily the same size and searching for all files with the same content, but not necessarily with the same name.
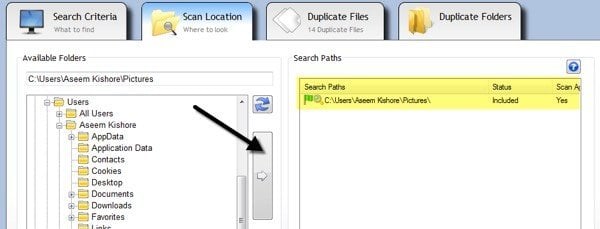
Once you choose the search criteria, you then have to add the search locations. Go ahead and navigate to the folder and then click the little arrow button to move that folder to the Search Paths side.
When you are done, click the Scan Now button at the top and the results will show in the Duplicate Files or Duplicate Folders sections.
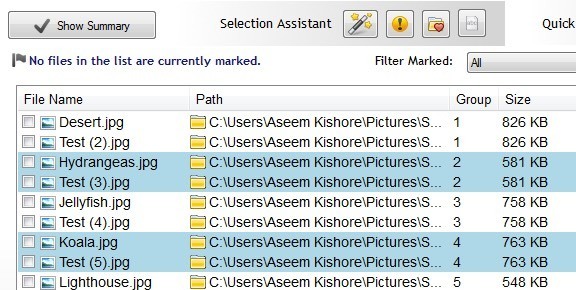
Now to get rid of the files, you have to click on the little magic wand icon next to Selection Assistant, click on Mark, then Select by group, then select All but one file in each group.
This will mark all files in a group of duplicates except for one. In order to delete the duplicates, you have to click on the circular File Removal icon at the top. You can mark files with different criteria also, but this is the easiest way when trying to get rid of duplicates.
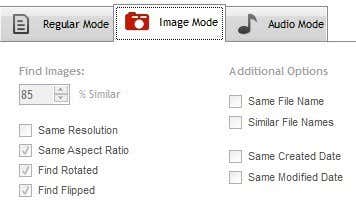
You may have also noticed the Image Mode and Audio Mode under Search Criteria and both work very well, but not all of the features are free. The image mode option is the best, but it requires you to purchase the Pro version for $30. I would highly recommend the Pro for anyone who really has to deal with a ton of duplicates including photos and audio files because I used it and it saved me a lot of time the free version could not accomplish.
With image mode, you can find similar images even if they have a different resolution or have been rotated or flipped. Audio mode will let you search for duplicate songs by metadata for free, but if you want to compare the actual audio data, you’ll have to purchase the Pro version.
Fast Duplicate File Finder
If you’re looking for just finding exact duplicates, then Fast Duplicate File Finder is a good choice. The free version will let you find unlimited exact duplicates, but only 10 groups of similar files. The similar files functionality is quite useful since it can help you find documents like Word docs that are exactly the same in terms of content, but for some reason have different sizes and other slight variations.
However, that functionality along with a few other features like filters and the ability to delete the duplicate files will set you back $40, which is a way too high for a program that just finds duplicates. However, the free version does a good job of finding exact duplicates.
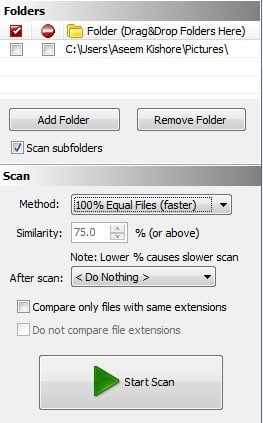
Just click Add Folder at the top to select the folders you want to search for duplicates, then choose your search method and finally click the Start Scan button. By default, the free version will give unlimited results for 100% Equal Files, which means they have to be the exact size.
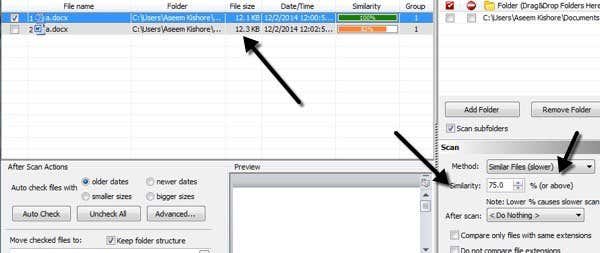
Again, this program would not show me the two Word files that had the same name and had the same contents because they were slightly different in size. When I chose the Similar Files option and set the Similarity value to 75%, then it showed them correctly. However, it will only show you 10 groups of similar files in the free version, which is kind of annoying.
Overall it is a good program, but only useful for exact duplicates. Works best with multiple copies of pictures, videos or audio files and not so well with documents.
Anti-Twin
It’s got a funny name, but Anti-Twin is another good duplicate finder that has a clean interface and doesn’t try to bombard you with ads. As with most of the other programs mentioned above, it doesn’t quite catch all the duplicate documents unless you search by identical file name. Usually with documents, it’s rare that you’ll have duplicates with a different name, so these programs will still work for most people.
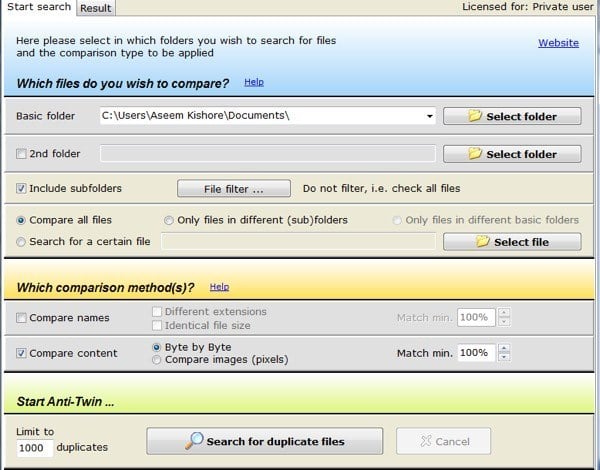
In Anti-Twin, you have to choose from either one or two “base” folders and then from a couple of options. If you have two folders under a main folder, then you can simply choose the top-level folder as a base folder and then check the Include subfolders box. You would then select Only files in different subfolders for comparison.
If you have two folders that are in completely different locations, choose one base folder then check the 2nd folder box and choose the second folder as another base folder. Then you would check the Only files in different basic folders box. You can also select Compare all files to compare everything in the base folders and/or subfolders to each other.
For Comparison methods, you can either Compare names or Compare content or compare both. Note that if you check both boxes, the comparison will before an AND operation meaning that both criteria will need to match in order for it to show as duplicate.
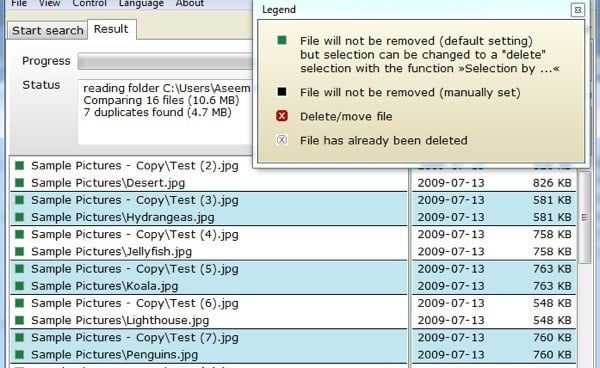
Click the Search for duplicate files button and you’ll be brought to the next screen where you can see the results. What I really like about this program is the ability to compare images (pixels) when searching for duplicate pictures. Basically, if you have two images that are the same, but one is of lower resolution, you’ll want to click Compare Content and then click the Compare Images (pixels) radio button. Reduce the percentage to 95% of less and then perform the search.
As you can see, I had two files with the same name, but different sizes due to the resolution. When you reduce the match percentage, you’ll see a new checkbox called inc. 100%, which basically will show you the pictures that are exact duplicates also. Otherwise, you’ll only see the ones that are similar, but not exact matches.
So there you have four programs that have different advantages and disadvantages, but get the job done. There are a ton of other duplicate remover programs, but a lot of them have ads or come bundled with junkware. If you have any questions or issues, post a comment. Enjoy!
Related Posts
- Insta360 Ace Pro Vs GoPro HERO12 Black: Which Action Camera Should You Get in 2024?
- Top 12 Workout Tracker Apps For Your Exercise Routine
- Nano IPS vs. IPS Displays: What’s Different and Which Is Better?
- The Top 8 Plex Alternatives You Should Try
- 5 Best Team Management Apps (For Small and Large Teams)
