If you’re running Windows 10, you might be happy to know that there is now a simple and elegant way to view your Google email, contacts and calendar using built-in store apps rather than using Outlook.
Outlook is a great email client for corporate employees, but I’m not a big fan of it for my personal email. However, before Windows 10, I had no other option other than using Outlook or keeping one tab open in Chrome all the time for my email.
The new Mail, Calendar and People apps can all be synced with Gmail, Google Calendar and Google contacts, respectively. The best part for me, however, is that the apps look really slick and I actually like using them. In this article, I’ll show you how to quickly and easily get your Google account synced with Windows 10.
Setup Gmail in Windows 10 Mail App
To get started, let’s setup the Mail app first. The great thing about the three apps in Windows 10 is that they are all integrated. Once you add your Google account to the one app, it will automatically be added to the other two apps too. In addition, each app has links to the other apps in the sidebar, so it’s super easy to switch between the apps.
To open the Mail app, just click on Start and type in Mail. The top result should be Mail – Trusted Microsoft Store app.

The Mail app is split into three sections: on the left is the sidebar where you will see your list of email accounts and folders, the middle is where a short description of the all the emails in that folder will appear and the right pane will show the full individual email.
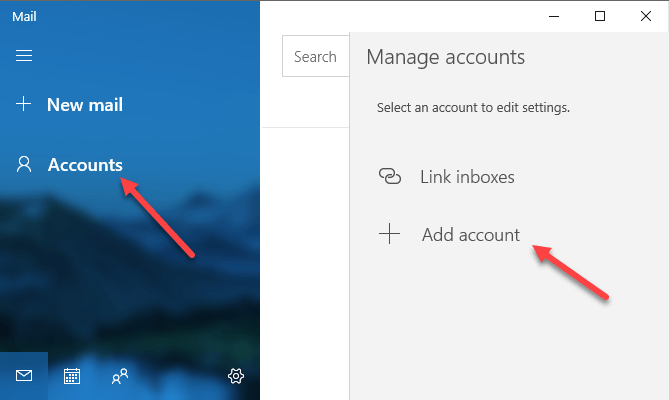
Click on Accounts in the left sidebar and then click on Add account in the right panel that appears. A popup dialog will appear where you can choose your email service provider.

You can add an Outlook.com account, Exchange account, Yahoo email, iCloud email or any other POP or IMAP enabled email account. In our case, we will select Google. Go ahead and enter your Google credentials and click Allow to let Windows access your email, calendars and contacts.

If all went well, you should get a successful message indicating that the account has been added to Windows.

All of the email from your Gmail inbox should now show up inside the Mail app. You’ll notice that by default, the Mail app only shows you the Inbox folder and that’s it.

So what if you have a whole bunch of Gmail labels? Well, go ahead and click on the More link and it’ll load up all the rest of your Gmail labels, which are basically folders in the Mail app. However, the panel disappears once you click off of it, so if you need access to several labels all the time, it’s a good idea to right-click and choose Add to Favorites. These labels will now show up under the Inbox folder and can be accessed all the time.

By default, the Mail app only downloads email from the last 3 months. If you want to change that, you need to go into settings. If the left sidebar is not already expanded, you can expand it by clicking on the three horizontal lines at the top left. Then, click on the gear icon at the bottom right of the sidebar.

At the far right, a slide-in panel will appear where you can adjust various settings for the Mail app. At the top, you want to click on Manage accounts.

Next, click on the email account you want to adjust settings for. In our case, it’s for the Gmail account.

Click on the account and a dialog will appear where you can change the name of the email account, delete it or change the mailbox sync settings.

Clicking that option will load the Gmail sync settings dialog. Here you can choose when new email should be downloaded and whether to download the full message and Internet images.

Below that, you can change how often to sync your contacts and calendars and how far back you want to download email from. The only other option past 3 months is Any time, which will download all email regardless of date.
Lastly, you can turn off email, calendar or contacts individually if you like. It’s worth noting that you can adjust these settings in exactly the same way in the Calendar and Contacts apps too.
Sync Google with Calendar and People Apps
Now that you have your Mail app setup in Windows 10, all you have to do is open the Calendar and People apps to see your Google calendars and Google contacts.

By default, all calendars should be checked, but you expand out Gmail and manually select or deselect the calendars you want to view. Now open the People app and you’ll see it looks very similar to the other two apps. Microsoft did a good job of making them all have the same look and feel.

That’s all there is to syncing our Google email, contacts and calendar with Windows 10. It’s so far been an enjoyable experience and hopefully Microsoft keeps updating the apps to make them better. Enjoy!