If you’re trying to link two computers together, the easiest method is to join them to the same network. Wired connections using ethernet work best for speed and reliability, but it’s easy enough to link together two devices wirelessly, especially if you have an existing wireless network available to use.
If you don’t have an existing network, you could create an ad-hoc wireless network, use Bluetooth to make the connection, or use a portable WiFi router or a smartphone to create a temporary network for you. If you want to know how to connect two computers wirelessly, here’s what you’ll need to do.
Joining an Existing Wireless Network
If you want to network two computers wirelessly, the easiest method is to use an existing wireless network to make the connection.
While other methods listed below will allow you to make a connection, they won’t offer you the reliability that an established network will. A network with a dedicated wireless router will offer the best speeds and WiFi range, as well as potential internet access and access to other devices on a network (such as a network printer).
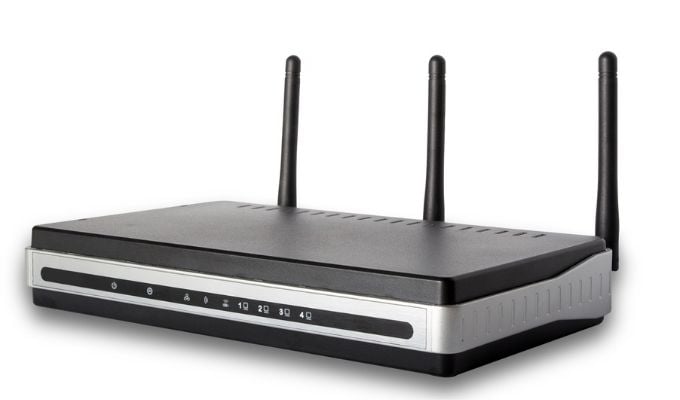
Once two devices are joined to an existing network, it’s a straightforward process to share files, play local games, and do much more.
Creating an Ad-Hoc Wireless Network
If you’re lacking an existing local network to connect to, you can use your PC’s or laptop’s wireless adapter to create an ad-hoc wireless network instead. This is a temporary network that uses a built-in or USB WiFi adapter to create a network that other devices can connect to.
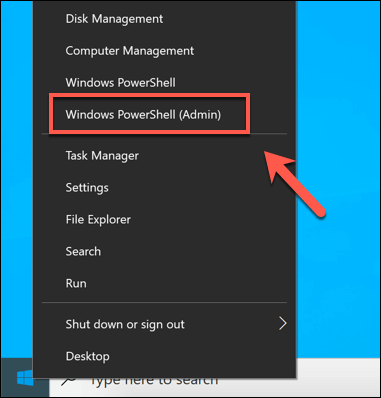
- To set up an ad-hoc network on Windows 10, you’ll need to use the Windows PowerShell. To open this, right-click the Start menu and select the Windows PowerShell (Admin) option.
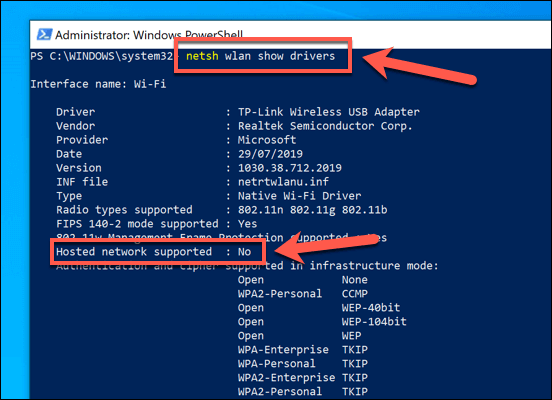
- In the open PowerShell terminal window, type netsh wlan show drivers. This will list information about your available WiFi devices, including whether they support the ability to create a virtual access point. If the Hosted network supported option is listed as no, then you may need to update the installed driver or try another device.
- If your device supports it, type netsh wlan set hostednetwork mode=allow ssid=adhoc key=password to create a virtual WiFi network, replacing the ssid and key sections with your own preferred network name (ssid) and WiFi network password (key). Once you’ve done that, type netsh wlan start hostednetwork to start the network.
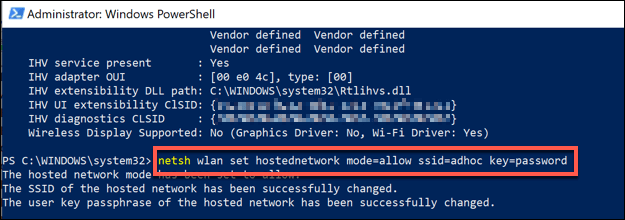
- Assuming there are no errors, the ad-hoc wireless network you’ve created should be visible to other devices. Connect to it using the network password you specified to complete the connection.
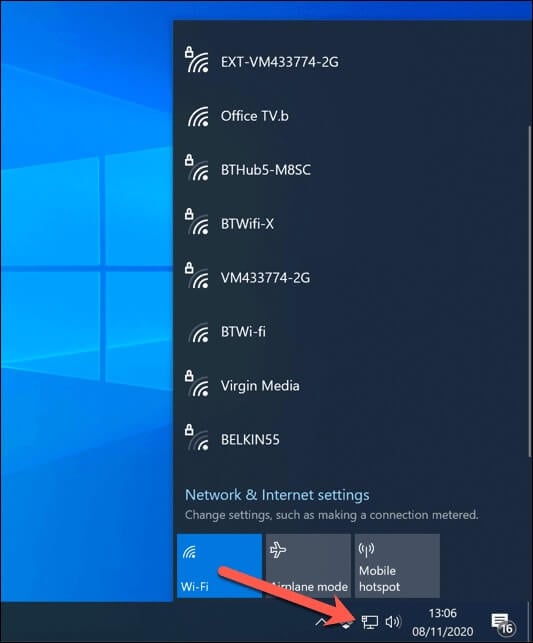
- If you want to disable the ad-hoc network when you’re finished, type netsh wlan stop hostednetwork in the open PowerShell window. Any devices that are currently connected will be disconnected at this point and the ad-hoc network will no longer be visible to other devices.

Once an ad-hoc network has been established, you can use it to share files across devices or use internet connection sharing to share an existing internet connection.
Connecting Two Computers Wirelessly Using Bluetooth
While a WiFi network (permanent or ad hoc) is a great way to connect two computers wirelessly, an alternative is to use Bluetooth to create a connection. While the available range and speeds require both devices to be nearby, Bluetooth has been designed with short-term connections in mind.
To connect two devices wirelessly using Bluetooth, you’ll need to make sure that both devices have Bluetooth connectivity. Many modern laptops and PCs come with Bluetooth built-in, but you can use an external USB Bluetooth adapter to make a connection if it’s missing.
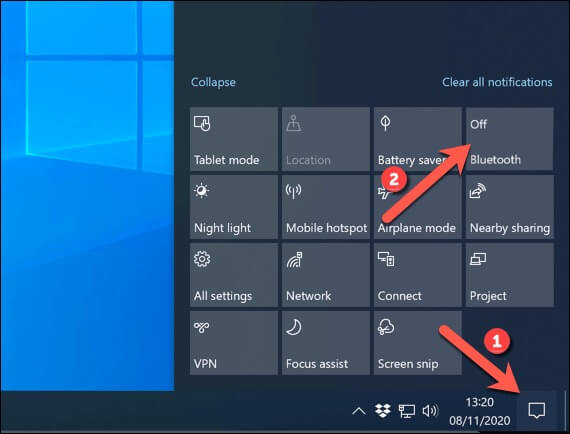
- To start, make sure that Bluetooth is turned on on the devices you’re looking to connect. You can do this on Windows 10 by selecting the action center icon in the bottom-right corner of the taskbar, then selecting the Bluetooth card to the On position.
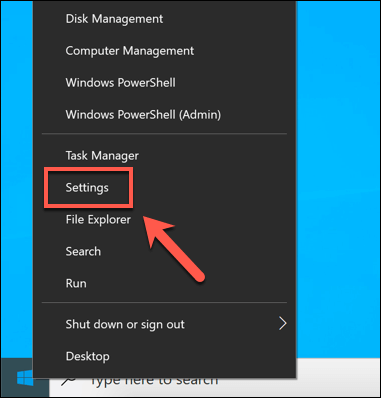
- Next, open the Settings menu by right-clicking the Start menu and selecting the Settings option.
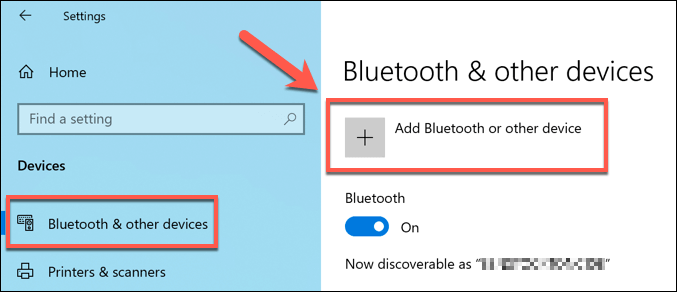
- In the Settings menu, go to the Devices > Bluetooth & other devices menu, then select the Add Bluetooth or other device button.
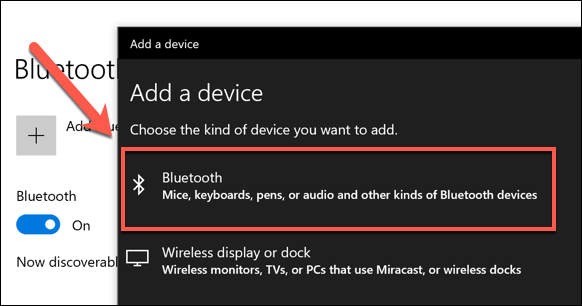
- In the Add a device window, select the Bluetooth option.
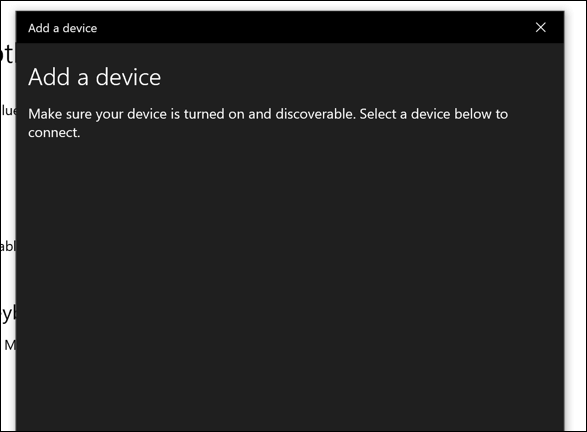
- A list of nearby Bluetooth devices will appear in the next menu. Select the other computer you wish to connect with to begin to establish a connection. You may need to authenticate by typing in a PIN code that will be displayed on both screens.
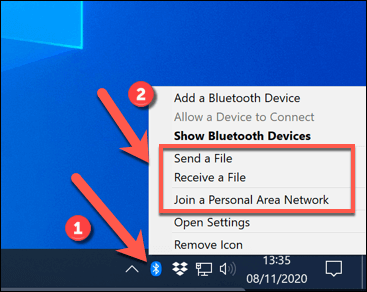
- Once you’ve established a connection, right-click the Bluetooth icon in the notifications area of your taskbar. From the menu, select the Send a File or Receive a File option to send or receive files, or Join a Personal Area Network to join or create a shared network that allows you to share an internet connection with the other device.
Using WiFi Direct to Send Files Wirelessly
If you’re struggling with an ad-hoc WiFi or Bluetooth connection, you could use WiFi Direct to share files instead. Windows fully supports the WiFi Direct standard, but to make things easier, you’ll need to use a third-party app called Feem to share files and establish connectivity instead.
If you plan on establishing a WiFi Direct connection on Windows, you’ll need to make sure that your WiFi adapter or device on at least one device supports the Microsoft Virtual WiFi Miniport Adapter. If this isn’t available, you won’t be able to create a WiFi Direct-capable network for another PC to connect to.
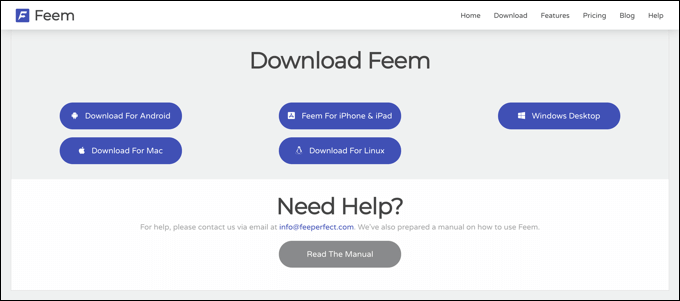
- To send files using WiFi Direct, download and install Feem for your operating system. Feem supports Windows, Linux, and macOS devices.
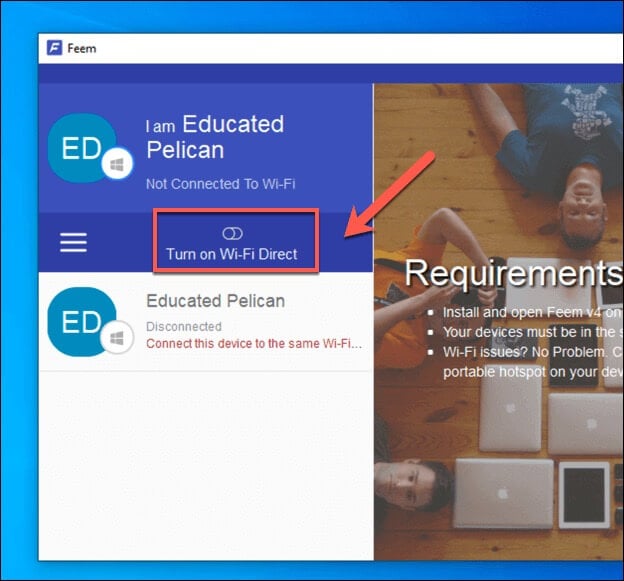
- Once Feem is installed on your PC or Mac, launch it. In the Feem window, select the Turn on Wi-Fi Direct slider to turn on the WiFi Direct network.
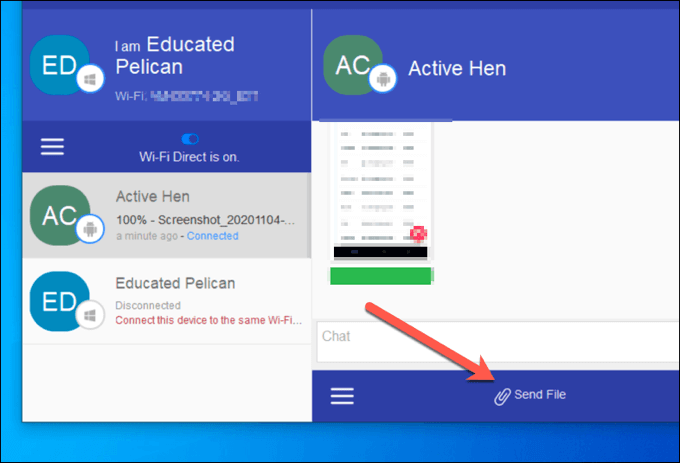
- On the other device, make sure to connect to the network created by Feem, beginning with FeemWiFi (eg. FeemWiFi-EducatedPelican). Once you’re connected, the other devices will be listed in the Feem window. Select the other PC in the Feem list, then select the Send File option to send a file to that PC.
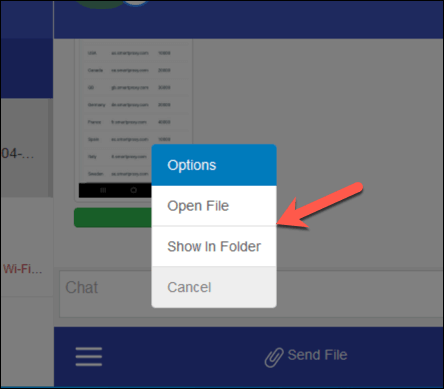
- On the other device, the file being sent will appear in the Feem chat log. Selecting the file will give you options to open it, or view it in Windows File Explorer.
Creating a Mobile Hotspot Using a Smartphone or Tablet
As Windows’ ad-hoc mode shows, creating a temporary wireless network can be a good way to connect two computers wirelessly for a short period of time, but that relies on you having a Windows PC around to do so.
An easier method is to use your smartphone or tablet to create a temporary wireless network instead. This turns your tablet or smartphone into a wireless router, allowing other types of devices to connect through it to share files or an internet connection.
The benefit of this method is that, by setting up a mobile hotspot, your mobile data connection will be shared with all devices that connect to it. Android devices running Android 2.2 and later, as well as iPhones or iPads running iOS 4.2.5 and later (including iPadOS), are capable of becoming a mobile hotspot.
- To do this on Android, open the Settings app. The settings menu will vary for different Android devices and versions, but select Network & Internet or Connections > Mobile Hotspot and Tethering.
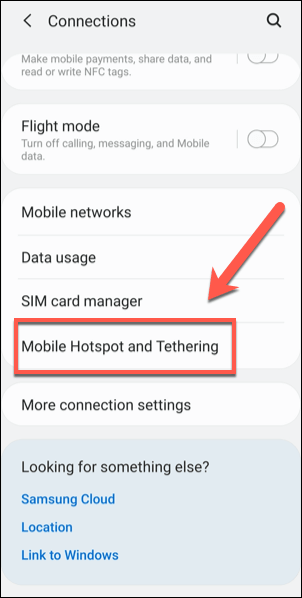
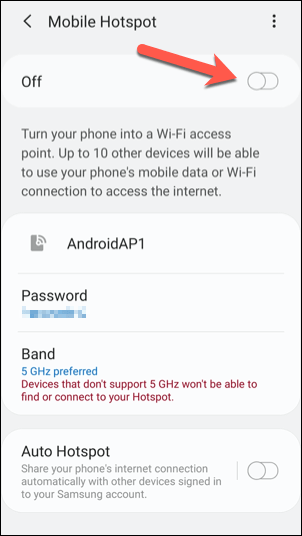
- In the Mobile Hotspot and Tethering menu (or Hotspot and Tethering on older devices), tap the Mobile Hotspot option, then tap the slider to the On position. Make note of the Password or change it, if required.
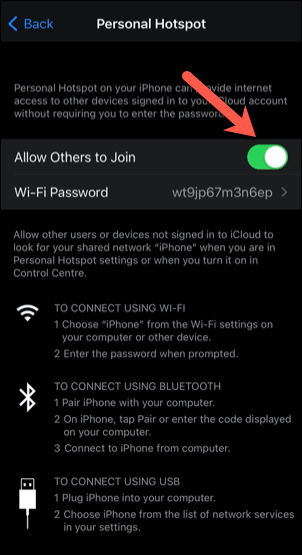
- On iPhone or iPad, open the Settings app. In the menu, tap Mobile Data or Personal Hotspot (depending on the device), then tap the Personal Hotspot slider to the On position. Take note of (or change) the Wi-Fi Password, as you’ll need this to connect to your temporary network.
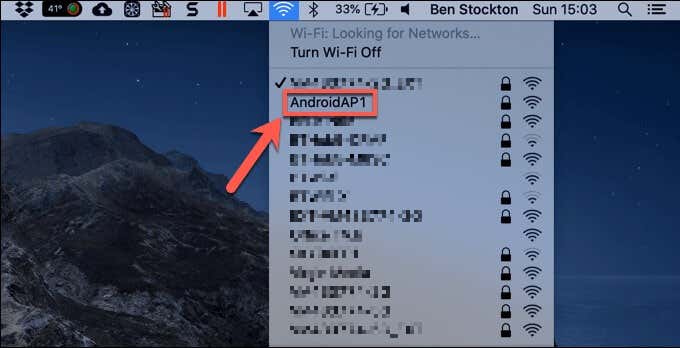
- Once the WiFi hotspot is active, connect to the network using the selected password on both devices.
While a mobile hotspot will only be able to connect a small number of devices together, it will allow you to connect at least two devices together wirelessly. Once connected, you can then use existing services to share files between platforms or use shared services.
Using a Portable WiFi Router
While a smartphone or tablet can create a quick, temporary mobile network, a better solution for a wider number of devices is to use a portable WiFi router. These have been designed for establishing simple temporary networks while you’re away from home, but can also be used in day-to-day usage for two PCs or laptops to connect.
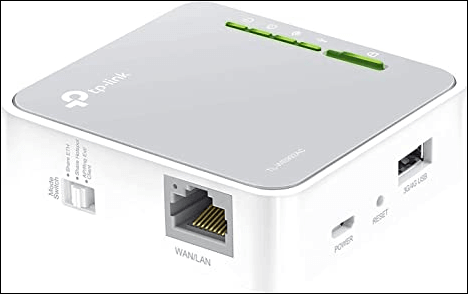
Devices like the TP-Link WR902AC create a network that any WiFi-capable device can connect to. More advanced routers, like the Huawei E5577Cs-321, also include built-in 4G connectivity, offering a dedicated mobile internet connection for devices that connect to it.
Most portable routers don’t require any setup—simply plug-in and connect. Others come packaged with a mobile app that can allow for quick configuration and device monitoring.
Other Connection Methods
If you’re researching how to connect two computers wirelessly, then the methods above offer your best options, with the ability to share files, internet connections, play games, and more.
If you’re trying to link two computers together, the easiest method is to join them to the same network. Wired connections using ethernet work best for speed and reliability, but it’s easy enough to link together two devices wirelessly, especially if you have an existing wireless network available to use.
If you don’t have an existing network, you could create an ad-hoc wireless network, use Bluetooth to make the connection, or use a portable WiFi router or a smartphone to create a temporary network for you. If you want to know how to connect two computers wirelessly, here’s what you’ll need to do.