When Chrome first released all the way back in September of 2008, the one thing that kept many Firefox loyalists from switching over was the robust amount of add-ons that Firefox offered.
By 2010, the Chrome Web Store had already surpassed 10,000 extensions. The total number of extensions available today isn’t shown publicly anymore, but it’s assumed to be well into the hundreds of thousands.

As Chrome’s library of extensions grows, so does the risk of installing and enabling extensions that may cause problems. Although the Chrome Web Store has policies that help keep malicious extensions out, some do pass through.
Similarly, there are some extensions that just encroach on users’ privacy far more than necessary. Often times, we bite the bullet and take the good with the bad—some extensions are hard to live without. However, did you know that you can do some management of your Chrome extensions’ permissions?
Instead of getting into how to uninstall Chrome extensions, let’s talk about how you can tame them!
How to Change the Permissions of Chrome Extensions
There are two different ways that you can change the permissions of your Chrome extensions, and both deal with modifying extensions’ site access.
The first way is by interacting with the extension’s icon in the extensions bar, and the second is by directly changing the list of site domains in the extension’s settings. Let’s go over each.
Change the Permissions of Chrome Extensions by Extension Icons
Your Chrome extensions bar is the area of the browser to the right of the address bar, where you see several icons for the extensions that you’ve installed.

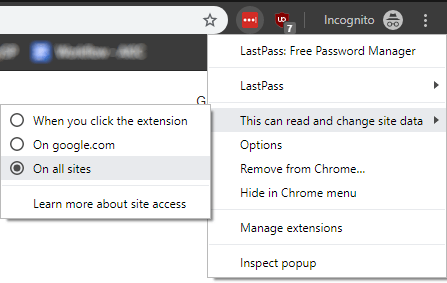
If you right-click on one of your extensions’ icons and hover “This can read and change site data”, you’ll see three options that will allow you to quickly change the extension’s permissions:
- When you click the extension
- On the site you’re currently on
- On all sites
The first option effectively defaults the extension to not having read and change access until you click the icon. The other two are self-explanatory.
This is useful when you have one extension that’s particularly “loud.” If one of your extensions is constantly using network data or sending you notifications, limiting it through one of these options is a great way to get it under control without having to remove it completely.
Change the Permissions of Chrome Extensions by Extension Settings
If you like the functionality of limiting the sites at which an extension can read and change data but don’t want to individually visit every single site, you can input them manually through the extension’s settings.

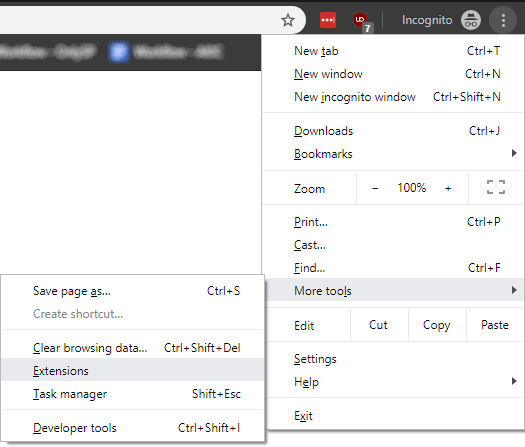
To do so, click on the hamburger menu icon to the right of your extensions bar, then go to “More tools” and Extensions.
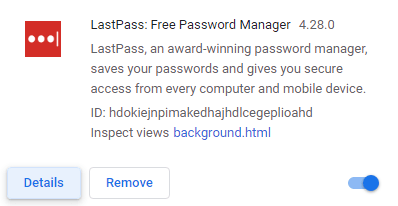
This will bring up a full page of all of the extensions you’ve installed. For the extension which you want to change the permissions of, click on the Details button beneath it.

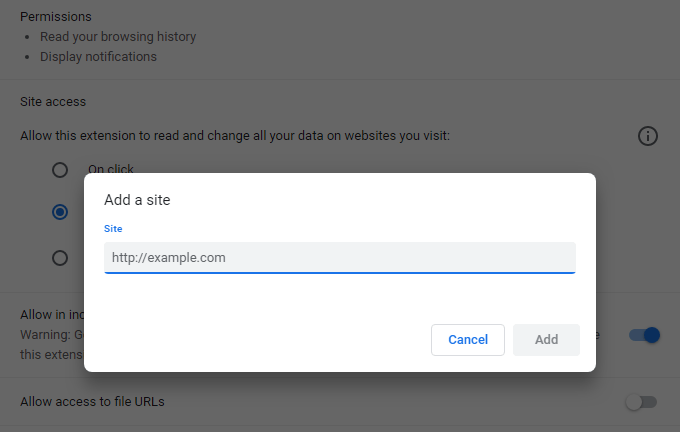
On the page that follows, you’ll see the same three options as you would through the extensions bar icons. However, if you select “On specific sites” here, assuming it wasn’t the originally selected option, you’ll be able to add websites by individual URLs.

If the extension you’re modifying already had this as the selected option, or after you’ve added at least one site, you’ll see a full list of the permitted sites. From there, you can add or remove more of them.
You don’t have to let your Chrome extensions take over your browser. While it’s unfortunate that Chrome extensions demand so much control over reading and changing site data by default, you can at least change the permissions for ones that are noticeably problematic in these two ways.