Have you got a private document or important work presentation you don’t want people to see?
You can protect private and sensitive information in a Word or PDF document by password-protecting the file. This encrypts the file’s contents so it can’t be accessed by anyone, or read by any program without entering the password first.

There are several options to password-protect the contents of a Word or PDF document, and limit access permissions on your Word and PDF documents.
Password-Protect a Word Document

You can protect a Word document using a password to help keep your content safe and secure, by preventing unauthorized access. The program offers different protection levels including locking documents with a password, and configuring different protection settings suited to your needs.
These features aren’t available in Word Online, though, but you can control file sharing and dictate whether or not someone else has edit access to the content, or even open them.
If you’re using Google Docs, your documents are protected by your Google account password, as the service doesn’t support password protection. Just be careful not to give out your account password or share the document with anyone, and you’re safe.
The steps below apply to users ofMicrosoft Word 2010 or later for Windows, with alternate paths for Mac users.
How To Password-Protect a Word Document In Windows
- Launch Microsoft Word and click File>Open and find the document you wish to password protect.
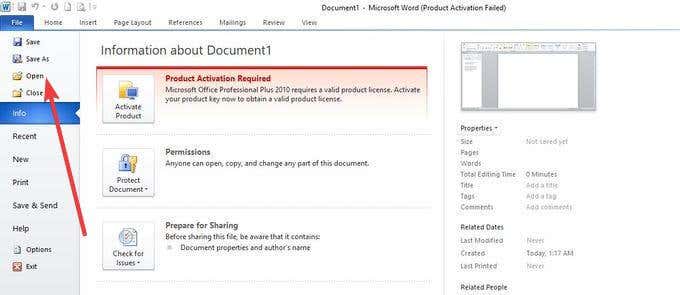
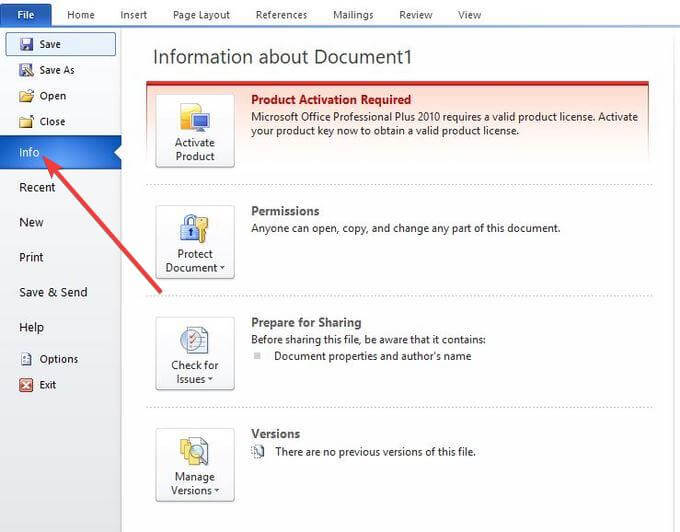
- Click File again and select Info from the left pane.
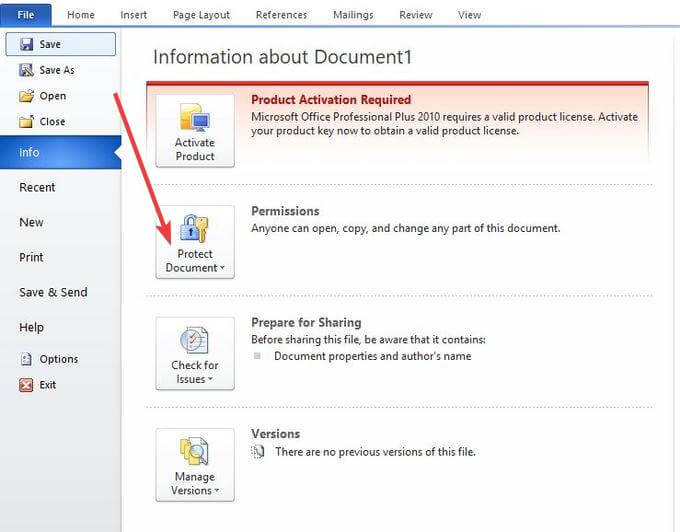
- Select Protect Document.
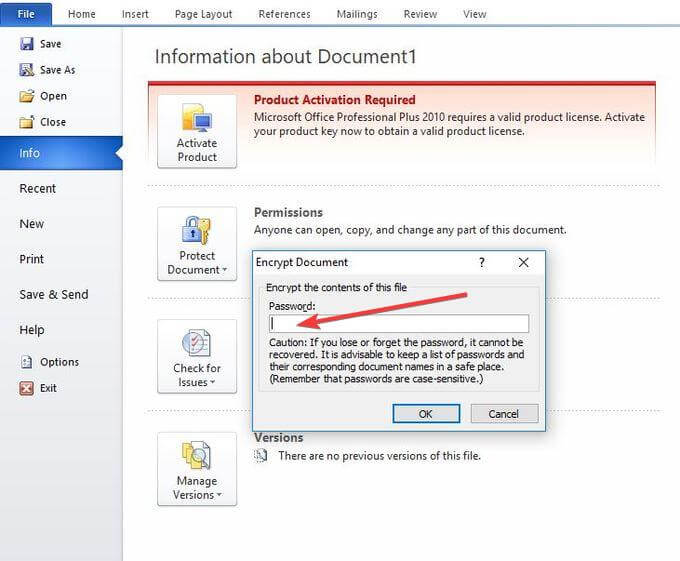
- From the drop down menu, select Encrypt with Password. Enter a password that you can remember and that’ll be required when anyone attempts to open this document.
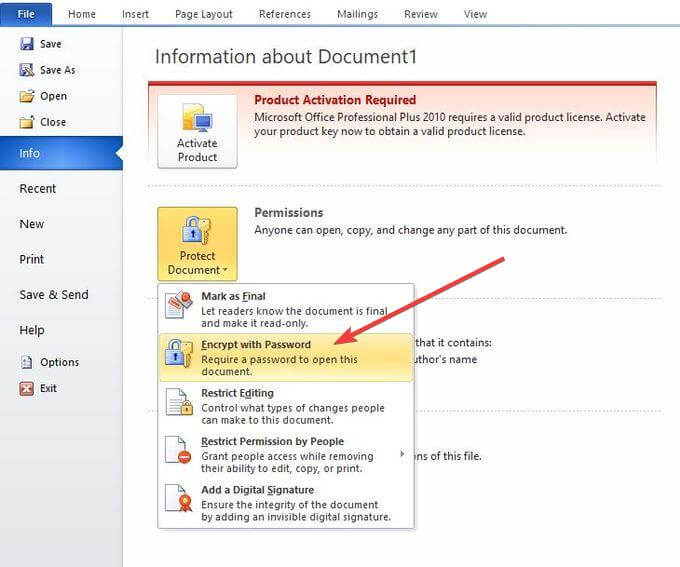
- Click OK. Enter the password again and click OK.
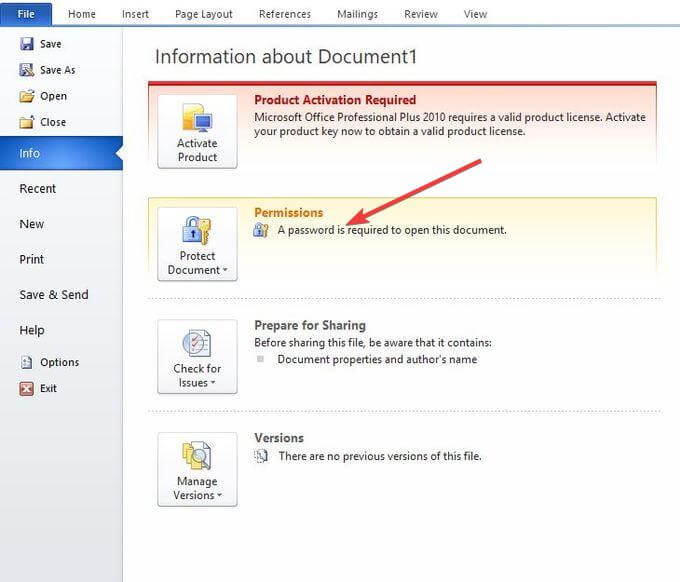
- In the Protect Document section, you’ll see a message that says a password is required to open this document.
How To Password Protect a Word Document In macOS
If you’re using macOS, the steps are a little bit different from the Windows operating system.
- Open the Word document you want to lock via password protection and click the Review tab.
- Click Protect Document. You’ll see the Password Protect dialog overlaying the main Word window

- Enter a password in the Set a password to open this document field and re-enter the chosen password a second time to confirm it. In the Set a password to modify this document field, enter a password and re-enter the password a second time
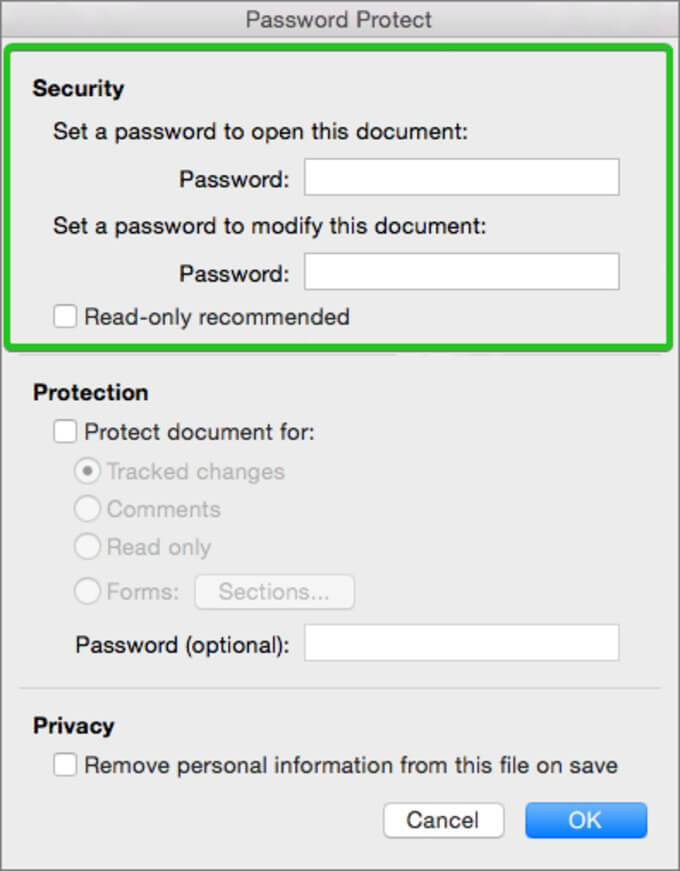
- Click OK. From this point forward, when a user opens the document, they’ll be prompted to enter the password. They can read and edit it, unless the author usedadditional protections.
Note: The passwords aren’t recoverable so make sure you enter one that you can remember, or store it somewhere safe. They’re also case-sensitive and can be up to 15 characters in length.
How To Remove Password Protection Restrictions From a Word Document
If you locked a Word document using password protection and you want to unlock it, sign in as the document owner and repeat the steps above for Windows or macOS until you’re back at the Protect Document button.
For Windows Users:
- Click Protect Document>Encrypt with Password.
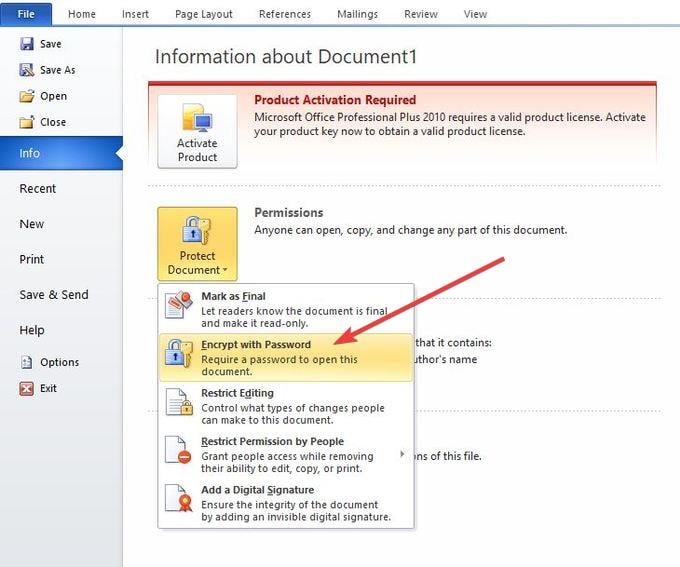
- Remove the password field.
- Click OK to unlock the document.
In the Protect Document section, it’ll now read: Anyone can open, copy and change any part of this document.
For macOS Users:
- Click the Review tab.
- Click Protect Document.
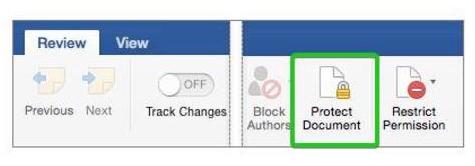
- Remove the password from the field provided.
- Select OK to unlock the document.
Password Protect a PDF Document
Whether you’re using Windows or macOS, there are several ways you can use to password protect aPDF document. Thankfully, PDFs have built-in support for password-protected encryption, unlike Microsoft Word.
We’re going to show you how to password protect a PDF using Adobe Acrobat and Microsoft Word. If you’re more interested in making changes to your PDF, we have a simple guide on theeasiest ways to edit a PDF too.
Using Adobe Acrobat
You can encrypt, add a certificate or a password to a PDF document and control access to your file.
In an organization or team setting, you can also create custom security policies that everyone can use to apply password protection for PDFs the same way each time.
Acrobat Pro DC includes the Publish Sensitive Information action that guides you through several steps to password-protect your file, while automatically applying edit and copy restrictions.
If you haven’t installed it on your computer, and don’t want to pay for it, you can use the free seven-day trial and access this feature.
- Open the PDF document you want to password protect by going to File>Open.
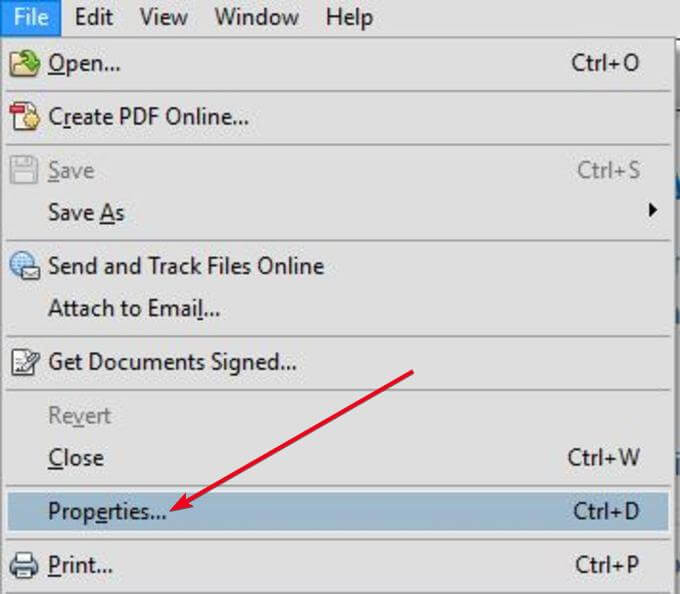
- Click File again and select Properties.
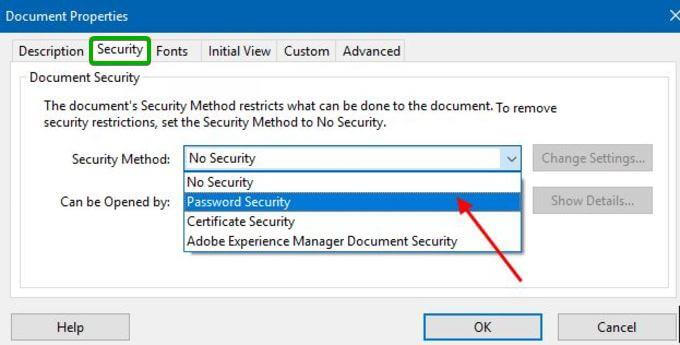
- In the Security tab, click the drop-down menu next to Security Method and select Password Security.
- Under the Document Open section, check the Require a password to open the document box.
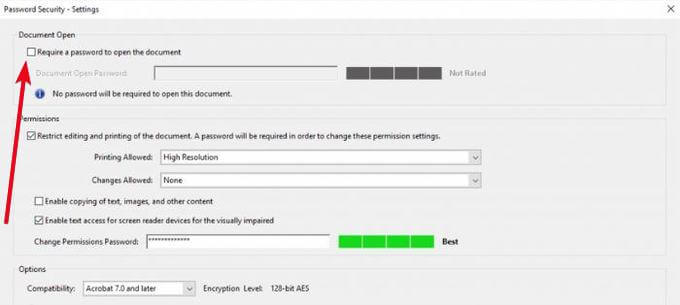
- Enter a password in the textbox.
- Save the PDF document to write the open password to it.
Using Microsoft Word
You’d never have guessed that you can use Microsoft Word to password-protect a PDF. You can password-protect a PDF by first creating it as a Word document and then encrypting it with a password.
- Open Microsoft Word and create a document (if your document is already in PDF format, you can convert the PDF to Word first, and then take the steps below).
- Click File>Save as.
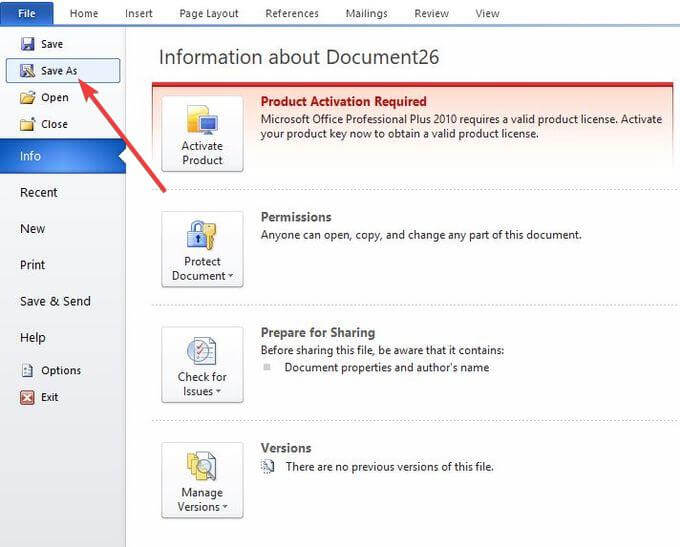
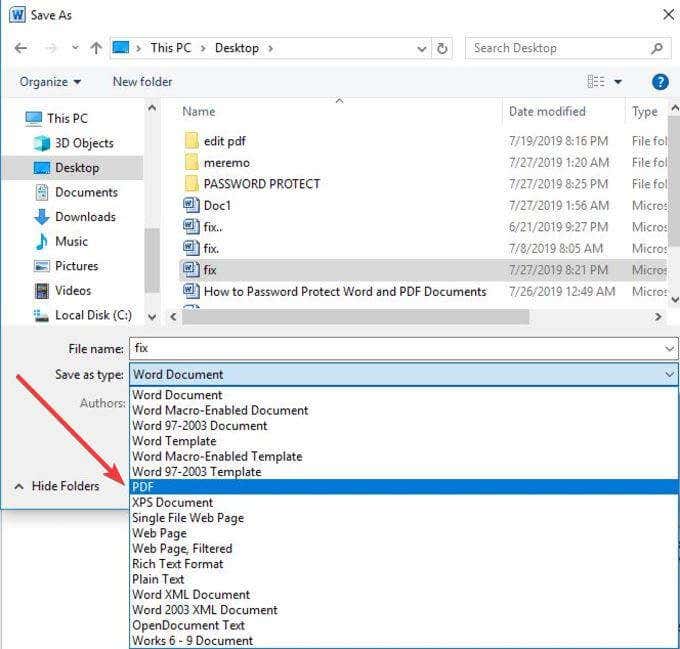
- From the Save as type drop down menu, select PDF format.
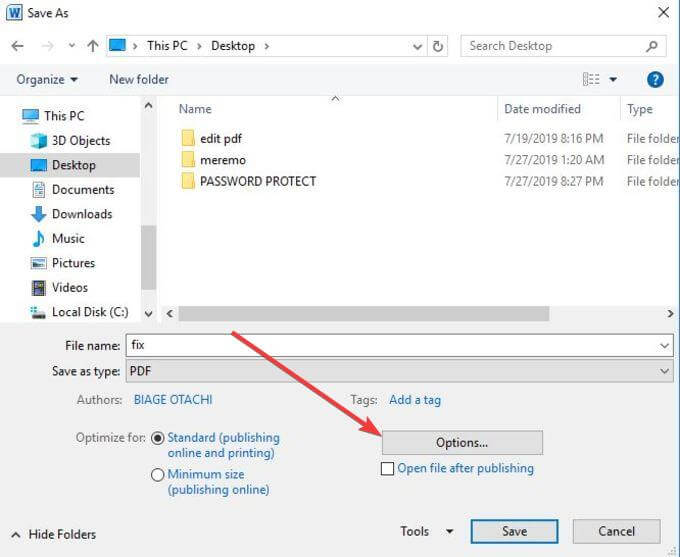
- Click the Options… tab.
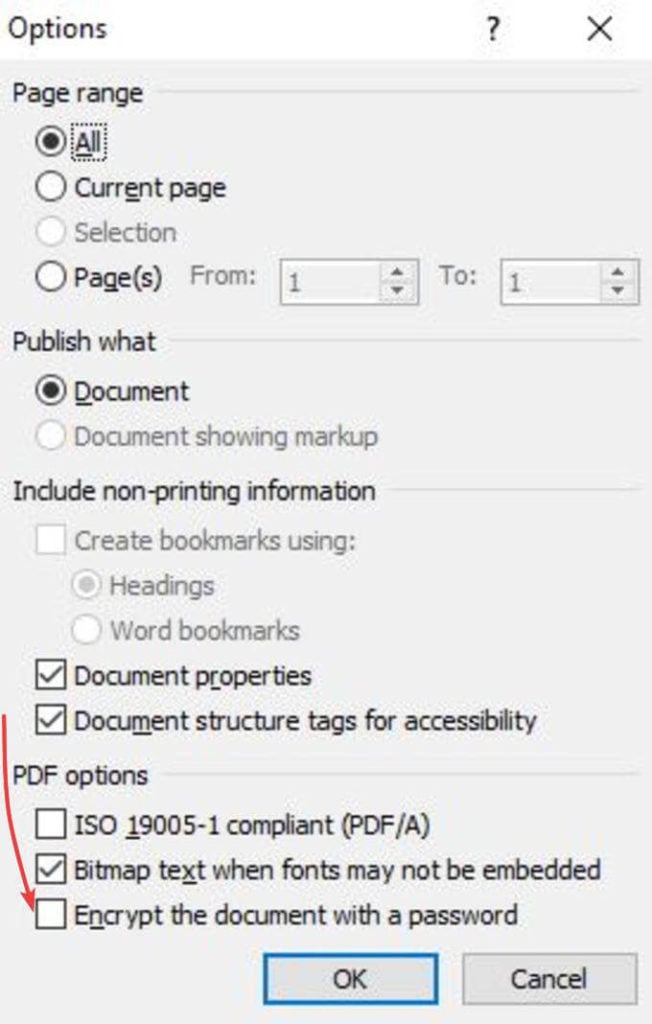
- In the popup box, check the Encrypt the document with a password box. Enter your password twice to confirm it.
These are the different ways you can password protect a Word and PDF document. Make sure you choose a strong password that no one can guess or crack.
If you’re not good at remembering passwords, our article on the best password managers has some great options that can help you with that.