If you’re reading this article, congratulations! You’re successfully interacting with another server on the internet using ports 80 and 443, the standard open network ports for web traffic. If these ports were closed on our server, you wouldn’t be able to read this article. Closed ports keep your network (and our server) safe from hackers.
Our web ports might be open, but your home router’s ports shouldn’t be, as this opens a hole for malicious hackers. However, you may need to allow access to your devices over the internet using port forwarding from time to time. To help you learn more about port forwarding, here’s what you’ll need to know.
What Is Port Forwarding?
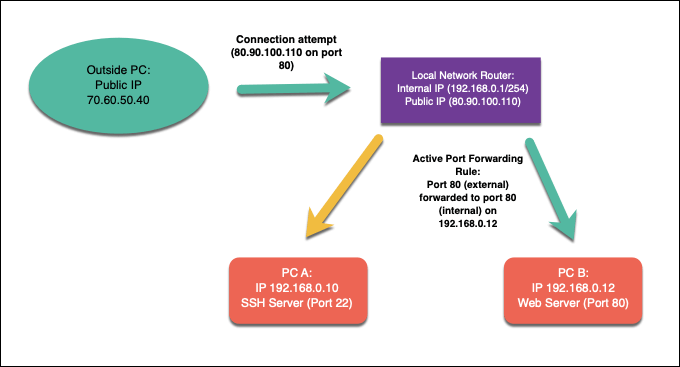
Port forwarding is a process on local network routers that forwards connection attempts from online devices to specific devices on a local network. This is thanks to the port forwarding rules on your network router that match the connection attempts made to the correct port and IP address of a device on your network.
A local network may have a single public IP address, but each device on your internal network has its own internal IP. Port forwarding links these outside requests from A (the public IP and external port) to B (the requested port and local IP address of the device on your network).
To explain why this might be useful, let’s imagine that your home network is a little like a medieval fortress. While you can look out beyond the walls, others can’t look in or breach your defenses—you’re secure from attack.
Thanks to integrated network firewalls, your network is in the same position. You can access other online services, such as websites or game servers, but other internet users can’t access your devices in return. The drawbridge is raised, as your firewall actively blocks any attempts from outside connections to breach your network.
There are some situations where this level of protection is undesirable, however. If you want to run a server on your home network (using a Raspberry Pi, for instance), outside connections are necessary.
This is where port forwarding comes in, as you can forward these outside requests to specific devices without compromising your security.
For example, let’s assume you’re running a local web server on a device with the internal IP address 192.168.1.12, while your public IP address is 80.80.100.110. Outside requests to port 80 (80.90.100.110:80) would be allowed, thanks to port forwarding rules, with the traffic forwarded to port 80 on 192.168.1.12.
To do this, you’ll need to configure your network to allow port forwarding, then create the appropriate port forwarding rules in your network router. You may also need to configure other firewalls on your network, including the Windows firewall, to allow the traffic.
Why You Should Avoid UPnP (Automatic Port Forwarding)
Setting up port forwarding on your local network isn’t difficult for advanced users, but it can create all types of difficulties for novices. To help overcome this issue, network device manufacturers created an automated system for port forwarding called UPnP (or Universal Plug and Play).
The idea behind UPnP was (and is) to allow internet-based apps and devices to create port forwarding rules on your router automatically to allow outside traffic. For instance, UPnP may automatically open ports and forward traffic for a device running a game server without the need to manually configure access in your router settings.
The concept is brilliant, but sadly, the execution is flawed—if not extremely dangerous. UPnP is a malware’s dream, as it automatically assumes that any apps or services running on your network are safe. The UPnP hacks website reveals the number of insecurities that, even today, are readily included with network routers.
From a security point of view, it’s best to err on the side of caution. Rather than risk your network security, avoid using UPnP for automatic port forwarding (and, where possible, disable it entirely). Instead, you should only create manual port forwarding rules for apps and services that you trust and that have no known vulnerabilities.
How to Set Up Port Forwarding on Your Network
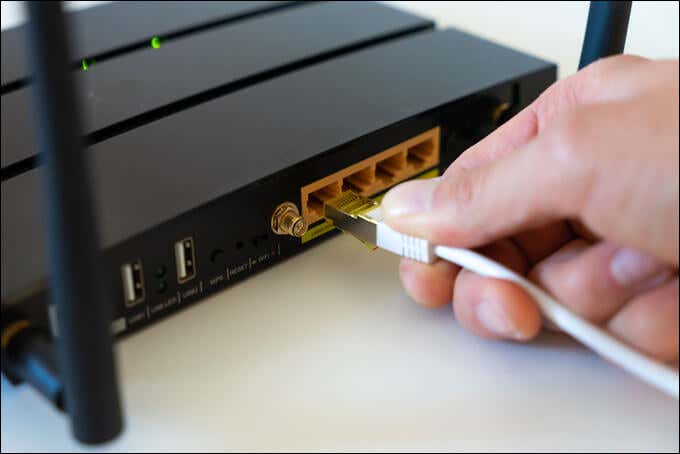
If you’re avoiding UPnP and want to set up port forwarding manually, you can usually do so from your router’s web administration page. If you’re unsure how to access this, you can usually find the information on the bottom of your router or included within your router’s documentation manual.
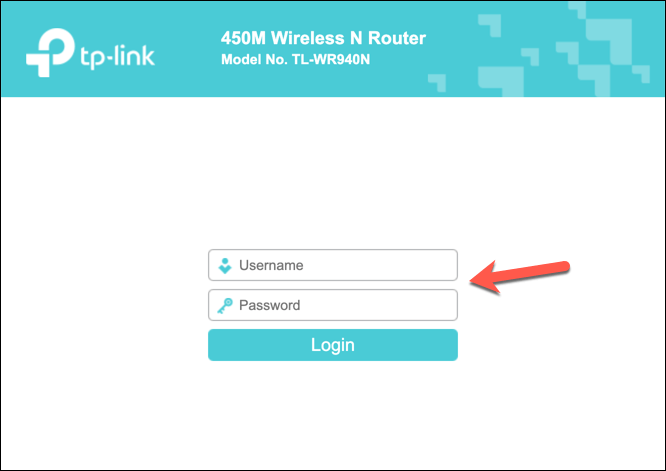
You can connect to your router’s admin page using the default gateway address for your router. This is typically 192.168.0.1 or a similar variation—type this address into your web browser’s address bar. You’ll also need to authenticate using the username and password supplied with your router (e.g. admin).
Configuring Static IP Addresses Using DHCP Reservation
Most local networks use dynamic IP allocation to assign temporary IP addresses to devices that connect. After a certain time, the IP address is renewed. These temporary IP addresses may be recycled and used elsewhere, and your device may have a different local IP address assigned to it.
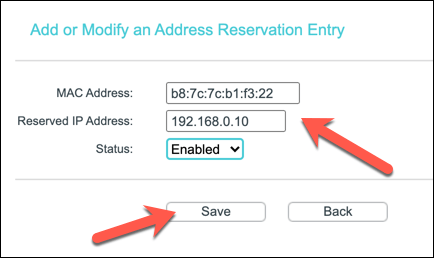
However, port forwarding requires that the IP address used for any local devices remain the same. You can assign a static IP address manually, but most network routers allow you to assign a static IP address allocation to certain devices in your router’s settings page using DHCP reservation.
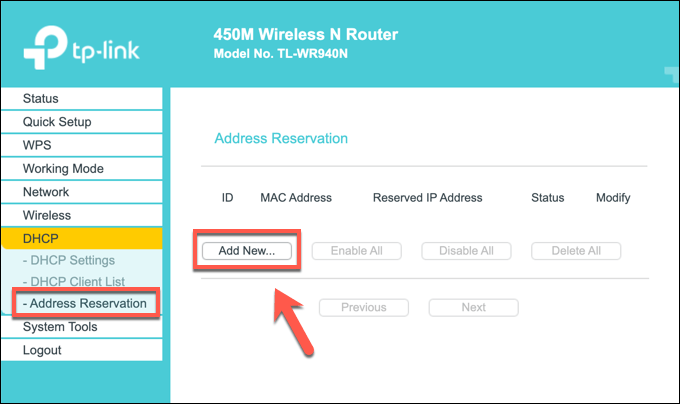
Unfortunately, each router manufacturer is different, and the steps shown in screenshots below (made using a TP-Link router) may not match your router. If that’s the case, you may need to look through your router’s documentation for more support.
To begin, access your network router’s web administration page using your web browser and authenticate using the router’s administrator username and password. Once you’ve signed in, access your router’s DHCP settings area.
You may be able to scan for local devices already connected (to autofill the required allocation rule) or you may need to provide the specific MAC address for the device you wish to assign a static IP to. Create the rule using the correct MAC address and the IP address you wish to use, then save the entry.
Creating a New Port Forwarding Rule
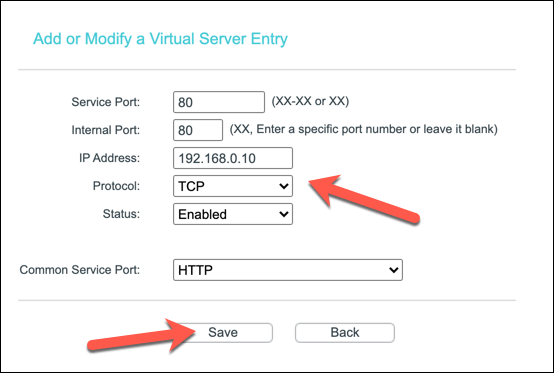
If your device has a static IP (set manually or reserved in your DHCP allocation settings), you can move to create the port forwarding rule. The terms for this can vary. For instance, some TP-Link routers refer to this feature as Virtual Servers, while Cisco routers refer to it by the standard name (Port Forwarding).
In the correct menu on your router’s web administration page, create a new port forwarding rule. The rule will require the external port (or port range) that you wish outside users to connect to. This port is linked to your public IP address (e.g. port 80 for public IP 80.80.30.10).
You’ll also need to determine the internal port that you wish to forward the traffic from the external port to. This could be the same port or an alternative port (to hide the traffic’s purpose). You’ll also need to provide the static IP address for your local device (e.g. 192.168.0.10) and the port protocol in use (e.g. TCP or UDP).
Depending on your router, you may be able to select a service type to automatically fill the required rule data (e.g. HTTP for port 80 or HTTPS for port 443). Once you’ve configured the rule, save it to apply the change.
Additional Steps
Your network router should automatically apply the change to your firewall rules. Any outside connection attempts made to the opened port should be forwarded to the internal device using the rule you created, although you may need to create extra rules for services that use several ports or port ranges.
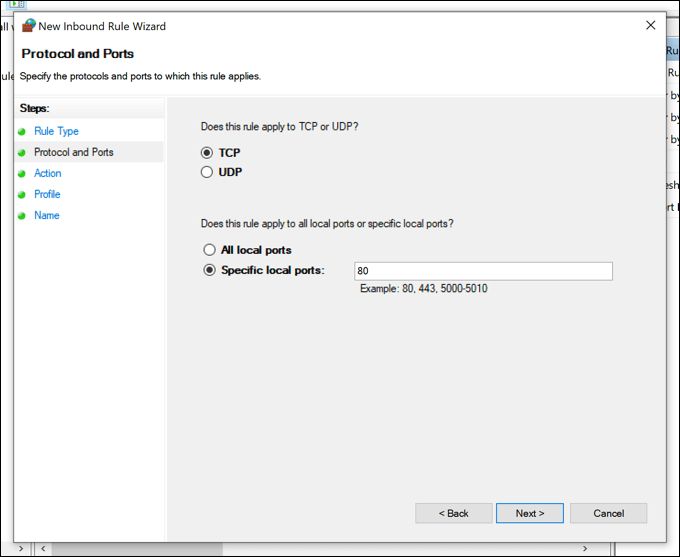
If you’re having trouble, you may also need to consider adding extra firewall rules to your PC or Mac’s software firewall (including Windows Firewall) to allow the traffic through. Windows Firewall won’t usually allow outside connections, for instance, so you may need to configure this in the Windows Settings menu.
If Windows Firewall is causing you difficulty, you can disable it temporarily to investigate. Due to the security risks, however, we’d recommend that you re-enable Windows Firewall after you troubleshoot the issue as it provides added protection against possible hacking attempts.
Securing Your Home Network
You’ve learned how to set up port forwarding, but don’t forget the risks. Each port you open adds another hole past your router’s firewall that port scanning tools can find and abuse. If you need to open ports for certain apps or services, make sure you limit them to individual ports, rather than huge port ranges that could be breached.
If you’re worried about your home network, you can boost your network security by adding a third-party firewall. This could be a software firewall installed on your PC or Mac or a 24/7 hardware firewall like the Firewalla Gold, attached to your network router to protect all of your devices at once.
