Changing the default search engine to something other than Bing is really easy in Internet Explorer and takes just a few clicks. That is, unless you work in a corporate environment and your network administrator has the web browser settings locked down.
Some admins go a little overboard with restrictions and forcing people to search using only Bing is a prime example. In this article, I’ll show you how to modify some settings in the registry so that you can use Google as the default search engine instead of Bing.
If the registry editor is disabled on your computer also, make sure to check out my previous post on how to re-enable the registry editor. It’s worth noting that the registry keys we will be altering aren’t critical to the system and therefore if you mess something up, nothing bad should happen to your computer.
However, just in case, make sure to read my post on backing up and restoring the registry first. The procedure is a bit technical, but if you follow along slowly, it’s not too hard. I tested this on Windows 7, Windows 8 and Windows 10 and it worked on all three operating systems.
Edit SearchScopes for IE in Registry
In IE, each search engine you add to the browser is called a search scope in the registry. First, before we get into the registry we have to create a new GUID that we will use as a key. Sounds scary, but just follow the instructions below.
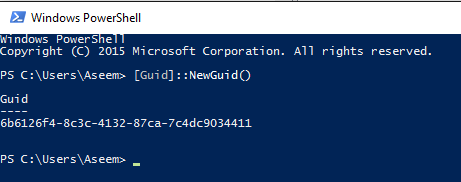
Step 1: Open PowerShell by clicking on Start and typing powershell.
At the prompt, just copy and paste the following command:
[Guid]::NewGuid()
This will generate a long number with letters and dashes like shown below. Select the GUID and then press CTRL + C to copy it to the clipboard.
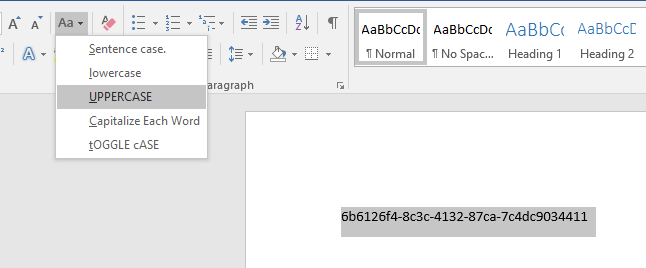
Now we have to convert this to uppercase because the registry is finicky about the case when creating keys. The easiest way to do this is to open Word, paste the text, select it and then choose UPPERCASE.
Step 2: Now let’s open up the registry editor by clicking on Start and typing in regedit. Now navigate to the following key:
HKEY_CURRENT_USER\SOFTWARE\Microsoft\Internet Explorer\SearchScopes
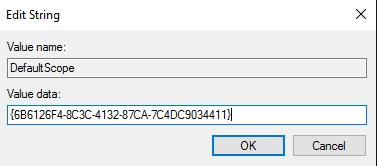
If you click on SearchScopes, you’ll see a few keys on the right hand side. The main one we are interested in is DefaultScope. Double-click on that and paste in the new scope ID that we just created.
Note that you have to add an opening curly brace and a closing curly brace around the GUID that we generated.
Click OK and the value should get updated. Now that we configured which search scope is the default one, we actually have to go create the new search scope.
Step 3: Right-click on the SearchScopes key in the left hand navigation pane and choose New – Key.
Again, paste the value of the new GUID as the name of the key. Again, make sure to add the curly bracket to the front and end of the GUID. The registry keys should look like the below image now:
Step 4: Now for the fun part. We have to create a couple of new keys in the right pane for the new search scope. So first, select the new search scope we created and you’ll see there is only one key called Default.
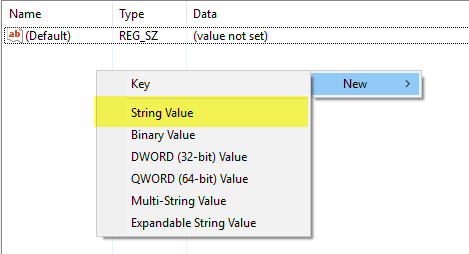
We have to create a total of five new keys. To create a new key, just right-click in any white area in the right-pane and choose New and then pick String Value for the first key.
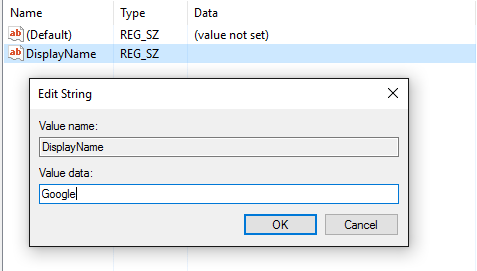
You want to give your new key a name of DisplayName and then press Enter. Then double-click on the new key and you can enter the value information. Type in Google in the value data box and click OK.
Now let’s add the rest in the same way. Below I will list out the key name (in bold), the type you have to choose (in italics) and the value you have to enter.
FaviconURL - String Value - http://www.google.com/favicon.ico
ShowSearchSuggestions - DWORD (32-bit) Value - 1
SuggestionsURL - String Value - http://clients5.google.com/complete/search?q={searchTerms}&client=ie8&mw={ie:maxWidth}&sh={ie:sectionHeight}&rh={ie:rowHeight}&inputencoding={inputEncoding}&outputencoding={outputEncoding}
URL - String Value - http://www.google.com/search?q={searchTerms}
After you have finished, the final entries should look like the image below:
Once everything is set in the registry, go ahead and open up Internet Explorer. You should not have to restart your computer for this to work. When IE opens, you might see a message at the bottom saying an unknown program wants to change your search provider. Go ahead and click Change.
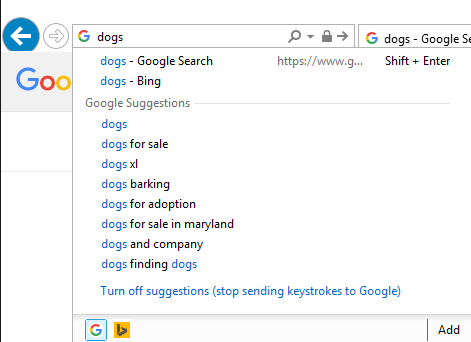
Now when you type something into the address bar, it should give you search suggestions and should search using Google when you press Enter.
If something didn’t work properly, make sure to check all the keys properly and that the GUID is the same for DefaultScope and for the name of the key under SearchScopes. Also, make sure the GUID has the opening curly and closing curly brackets in both of those instances.
Hopefully, this will help you get access to Google search in IE even if your system is locked down. If you have any questions, feel free to comment. Enjoy!

