Pretty much every spring Apple releases a new version of the iPhone and that means it’s time for everyone to decide if they can spare enough money for the latest model. If you have stuck with Apple over the years, you’ve probably upgraded your phone at least 2 or 3 times, even with those two year contracts.
When you get a new iPhone, the obvious task is to transfer all your data from your old phone to your new phone. In order to do this, you have to backup one phone and restore the backup on the second phone. You can do this in one of two ways in iOS: local backups or via iCloud.
In this article, I’ll show you how you can switch between two iPhones using the local backup method and via iCloud. Before we get started, though, I should mention some of the caveats and pitfalls that can occur along the way.
iOS Version Requirements
Most of the time, you’ll be restoring a backup from an older iPhone running an older version or the same version of iOS as your new phone and this will cause absolutely no problems. When you perform a restore, the version of iOS on the device has to be the same or newer than the version in the backup.
For example, if you have an iPhone 5S running iOS 8 and you are restoring that backup to an iPhone 6S running iOS 9, everything will work fine. However, if you updated your iPhone 5S to iOS 9.2.1, created a backup and then tried to restore it on your iPhone 6S running iOS 9.1, it won’t work!
The fix is relatively easy, though. In cases like that, just update your phone to a version that is higher than the version in the backup and you’ll be fine.
Transferring Passwords
The second major issue, at least for me, is getting all my passwords transferred over to my new device. It’s pretty easy to get all your apps, photos, messages, etc. transferred, but it’s a real pain to have to re-enter all your app passwords, Wi-Fi passwords, and website passwords.
There are two ways you can transfer your passwords to another iPhone: by encrypting the local backup or by turning on iCloud KeyChain. As I mention both methods below, I’ll point out how to activate these two features, which will save you a lot of tedious typing after a restore.
Local iTunes Backup
With iTunes, you can quickly create a full backup of your iPhone with a few clicks. For full details, read my previous post on backing up an Apple device. To get started, open iTunes and then connect your phone to your computer.
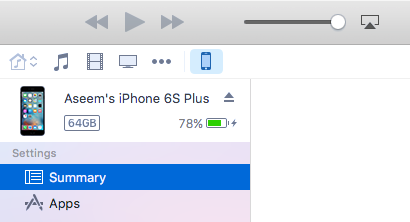
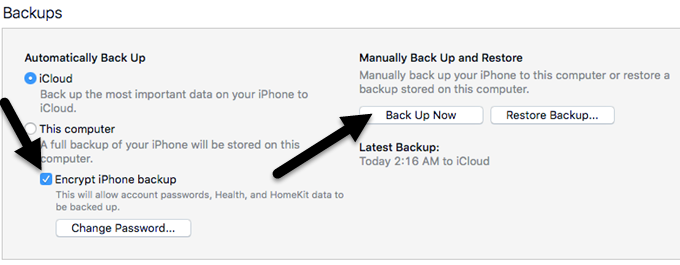
At the top, you should see a small iPhone icon appear. Click on that and it will load up the Summary page for your device. Under Backups, you’ll see what the current default backup option is for your phone.
In my case, iCloud is where my phone gets backed up to automatically. I highly recommend using both iCloud and local backups as an extra safety net. First, check the Encrypt iPhone backup box and choose a password to secure the backup with. Make sure you keep the password safely because you’ll need it in order to restore the backup.
Now simply click on the Back Up Now button to start the backup. If you see a message about purchases that are not in your iTunes library popup, go ahead and click on Transfer Purchases. In addition, you may get a message stating that you need to authorize your computer in order to transfer some content. You can authorize up to five computers per iTunes account.
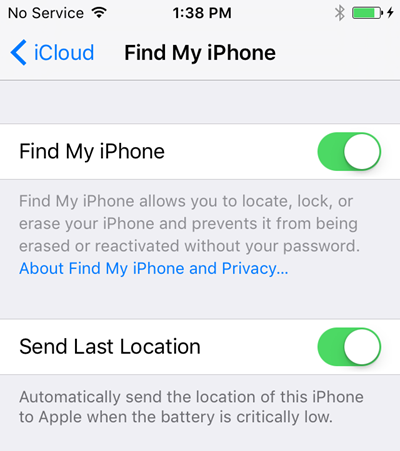
Once the backup is complete, you can disconnect your phone and connect the other one. Before you can restore a backup, you have to disable Find My iPhone on the phone where the backup will be restored. To do this, go to Settings, tap iCloud, tap Find My iPhone and then turn it off.
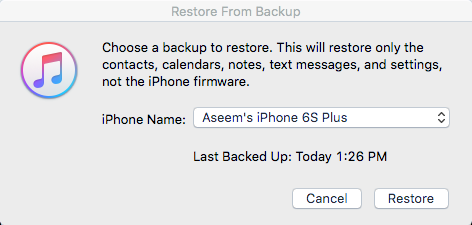
Now click on the Restore Backup button that is to the right of Back Up Now and choose the backup your just created. Note that if the backup you just created is missing from the list, it means there is some issue with the iOS version, which I mentioned above.
Click the Restore button and you’ll be asked to enter your password since the backup was encrypted. The only problem you can run into at this point is not having enough space on the second phone to restore the backup. For example, if you backed up a 64GB iPhone and try to restore it to a 32GB iPhone, you might run into an issue if the backup size is larger than the phone storage capacity.
In those types of cases, you either have to reduce the size of the backup by deleting content and data off the phone or you have to make sure the other phone has the same or a larger capacity.
iCloud Backup
If you prefer to use the cloud for your device backups, then iCloud works really well overall. In my experience, it just takes a lot longer than restoring from an iTunes backup because everything has to be downloaded over your Internet connection.
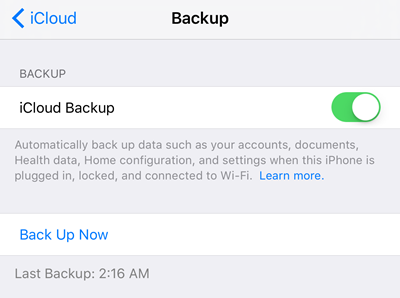
iCloud backups are done automatically, so as long as it’s enabled, you should already have a backup. If you’re not sure, tap on Settings, then iCloud and make sure Backup is set to On. Obviously, the phone should already be logged into iCloud with your Apple ID.
To manually create a backup in iCloud, just tap Back Up Now. It will also tell you the time of your last backup.
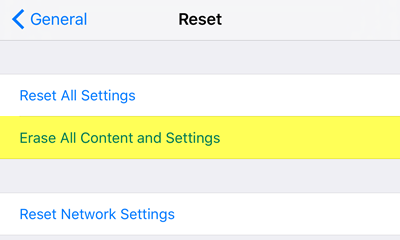
In order to restore an iCloud backup, you have to completely erase your iPhone. I’m not a huge fan of this method, but that’s the only way it works right now. So on the phone you want to restore the back to, tap on Settings, General, Reset and then Erase All Content and Settings.
You’ll then need to tap Erase iPhone twice before it actually starts erasing the phone. Again, Find My iPhone will need to be turned off first. Once the phone has been erased, it will start up with the Hello screen. Swipe and then choose your language and country.
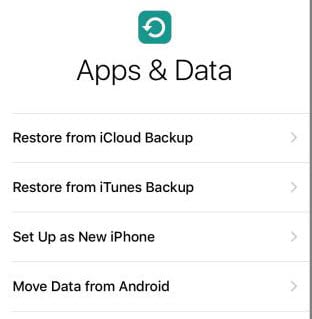
Next, connect to a WiFi network and then enable or disable location services. Skip past Touch ID and the passcode options and you’ll finally get a screen where you can choose how to restore your data. You can pick from iCloud Backup, iTunes Backup, Setup as New iPhone or Move Data from Android.
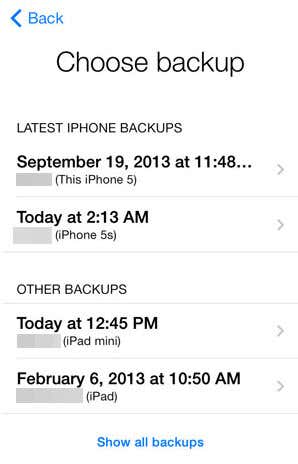
In our case, you will choose iCloud backup and then enter your Apple ID and password. When you do that, you may have to verify your identity if you enabled two-factor verification on your account. At this point, you should get a list of the recent iCloud backups from all your devices.
You’ll be able to see the date and time of the backup, the device and the name associated with that device. If a backup is greyed out, that means if cannot be restored to the device, probably due to iOS version issues.
As mentioned, it could take quite a bit of time for your iCloud restore to complete. Even after the iPhone loads, you’ll notice that it then downloads all your media and apps. It can easily take several hours for a phone to be restored using iCloud.
Make sure iCloud KeyChain is enabled before you restore your backup so that all that data will be synced once you log into iCloud on the new phone. To do that, tap on Settings, then iCloud, then KeyChain and enable it.
So those are all the procedures for backing up and restoring an iPhone to another device. In my opinion, it’s a good idea to pay for some extra iCloud storage and store your backups there in addition to locally on your PC. Apple has great hardware, but their software has quite a few bugs and I’ve run into issues with backups randomly missing or restores failing, etc. If you have any questions, feel free to comment. Enjoy!
