There’s no doubt that social media has made keeping connected with family and friends a whole lot easier. With a timeline of all your friends’ activity, it’s easy to stay close with those you love even if you’re thousands of miles away.
However, if you aren’t paying for a product, chances are that you’re the product yourself – and Facebook has made billions off of providing highly effective tools to advertisers using your information and browsing habits.
Over the past couple of years, a series of leaks and whistleblowers have made it very apparent the extreme amount of information Facebook has collected from users, and they haven’t always been the most scrupulous when it comes to privacy concerns.
Many have started to migrate away from the service, but there are a few extra steps you may have to take beyond simple profile deactivation if you want to keep your personal data protected.
Fortunately, Facebook has become pretty transparent about the type of data they’ve collected and also provide easy access to tools you can use to manage that data.
Download & Delete Facebook Data
Follow the steps below to download and delete data from Facebook and reduce your digital footprint.
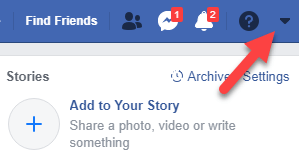
Step 1. Log into your Facebook account on a web browser and click the drop-down menu at the top right of the screen.
Step 2. Select Settings.
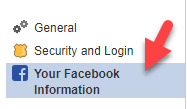
Step 3. On the left side of the screen, select Your Facebook Information.
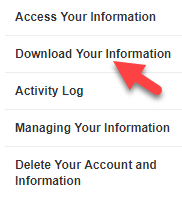
Step 4. Click Download Your Information.
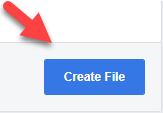
Step 5. On the next screen, click Create File.
Step 6. At this point, Facebook will give you a notification that your file is being processed. This can take a little while depending on how long you’ve been on Facebook and how active you have been on the site and around the web, but it shouldn’t take more than an hour or two in most cases.
Once the file is finished processing, you’ll get a notification on the website that the file is ready for downloading and can then download a full file of all of the information that Facebook has collected. This is great for collecting information you’d like to save before you delete your Facebook account completely, or even if you’d just like to be able to easily sort through the content the site has amassed over the years.
While we’re waiting for the file to be processed, however, we can look at a few more Facebook data settings.
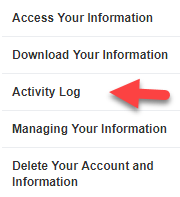
Step 7. Head back to the previous page and click Activity Log.
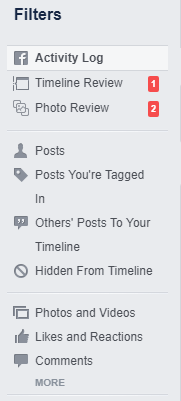
Step 8. This page is a collection of all of your activity and interactions with the website. You’ll see all your posts, comments, and even your reactions to every post on the site. For easier sorting, you can choose the data you’re interested in looking at using the Activity Log Filters at the left side of this page.
Step 9. Next to any activity, you’ll see two different icons. The icon on the left allows you to take a look at who that specific entry is visible to, and the icon on the right allows you to delete specific entries from your log. This is great if there are particular photos or posts that you’d rather not be floating around the web but are okay with the data management in general.
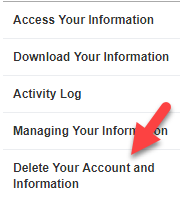
Step 10. In the event that you’d like to completely delete your account and all information associated with it, that’s an option too! Head back to the Facebook Information screen and click Delete Your Account and Information.
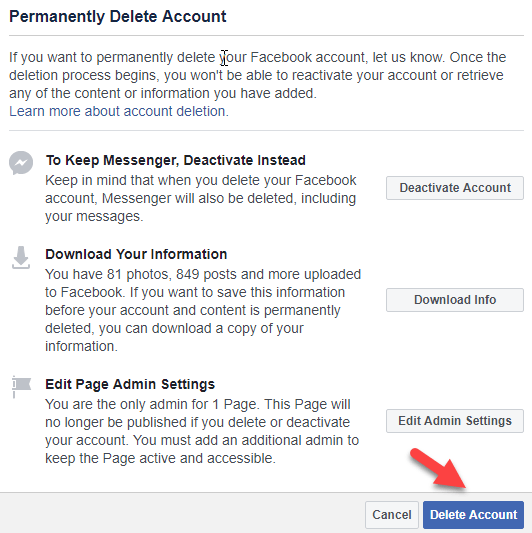
Step 11. The next screen gives you some information about what is going to happen when you confirm the setting, as well as some other options such as simply deactivating Facebook in order to retain access to Messenger. If you’d like to completely cut off Facebook, hit Delete Account at the bottom right of this window.
Just be sure that you’re 100% positive that you’d like to remove the account and data permanently, as there’s no going back after this point in the process. We highly recommend at least downloading your Facebook information through the process in steps 4-6 so you have a copy of any memories you’d like to keep for the future.
Overall, while Facebook has certainly come across as a little shady when it comes to the way they handle their users’ data, they do give you access to that data if you’re willing to do a little bit of digging.
One thing worth mentioning that many users don’t realize is that “rival” social network Instagram is also owned by Facebook. So if you’re looking to remove your data from the company’s servers completely, you’ll need to avoid using that app as well.
It’s certainly inconvenient to have to cut out two of the biggest social networks on the web, but for those who want better control over the way their personal information is used, it’s well worth a couple hours of effort to take a look at the collected data and ensure you’re as well-informed as possible. Enjoy!
