Are you worried someone’s stalking your Facebook? They say curiosity killed the cat, but sometimes you want to find out who’s been looking at your profile, photos, posts, and personal info. This tutorial will show you how to see who’s stalking your Facebook profile, posts, photos, etc. We’ll also show you how to protect your Facebook from stalkers.
Although Facebook allows you to see all your likes, you can’t actually see who’s been looking at your profile or what they’ve been looking at. You might come across apps or sites claiming that they can show you this information, but there’s no way for them to do this. However, there are some steps you can take to find out who might be looking at your profile the most.
How to See Who Interacts With Your Posts the Most
The easiest way to see who might be hanging around your Facebook profile is to post around five to six posts over a period of time, say, a week. By seeing who likes, comments, or interacts with your posts the most, you should know who is stalking your profile.
You should also post (random) stories over a specific period and consistently monitor the story viewers. If an unknown person or account constantly views, reacts, or replies to your story, they’re likely stalking your profile/account. See our tutorial on monitoring Facebook Story or story viewers for guidance.
How to See Who Is Stalking Your Facebook Profile on the Web
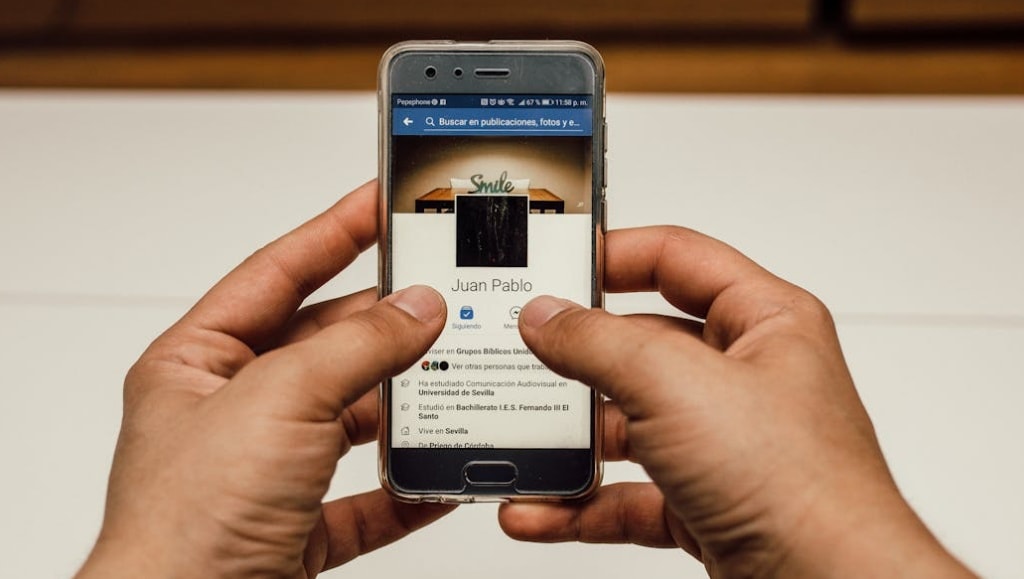
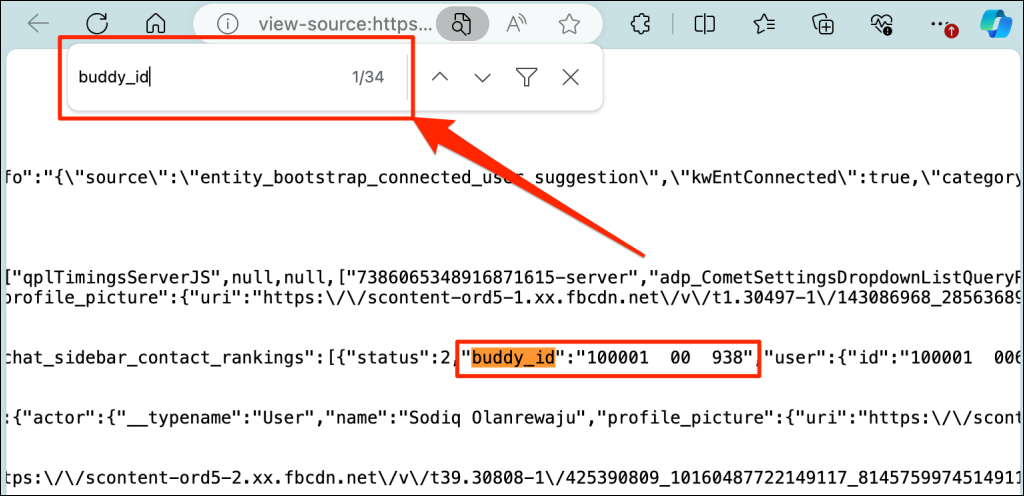
You can supposedly use your profile’s source code to check out who is stalking your account. Your profile’s source code contains the profile ID (or “buddy_id”) of Facebook users who visited your profile. A person ID is a unique 15-digit number linked to the profile of Facebook users.
Follow the instructions below to see how to see who visited your Facebook profile through your internet browser.
Note: This method shows who visited your profile, but it doesn’t tell how many times they visited. So, it isn’t exactly a surefire way to accurately tell who’s stalking your profile. Also, this method isn’t confirmed by Facebook or other official sources.
- Sign into Facebook in your web browser on any computer.
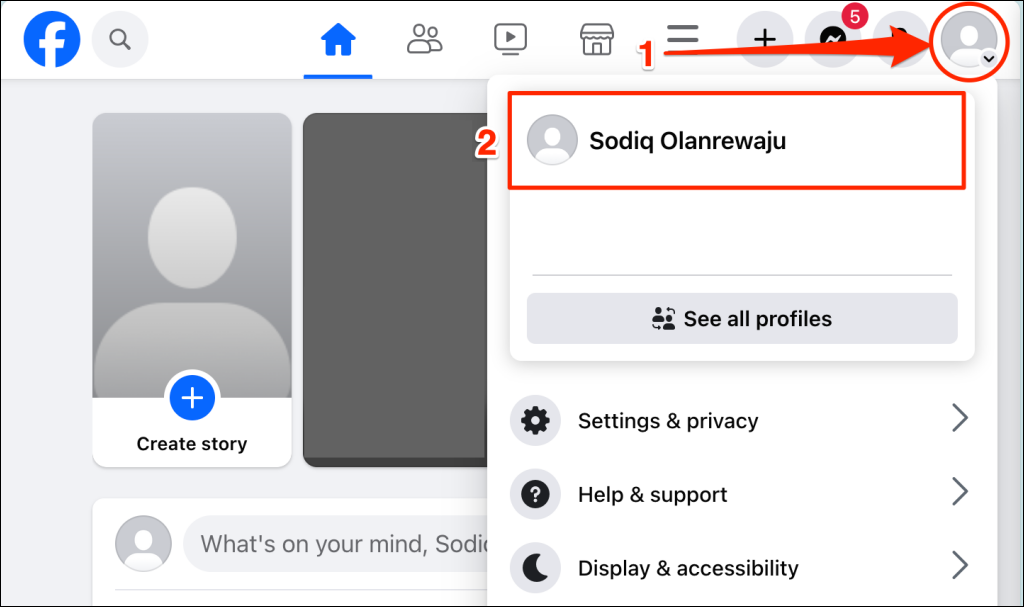
- Select your profile picture/icon in the top-right corner and your profile name.
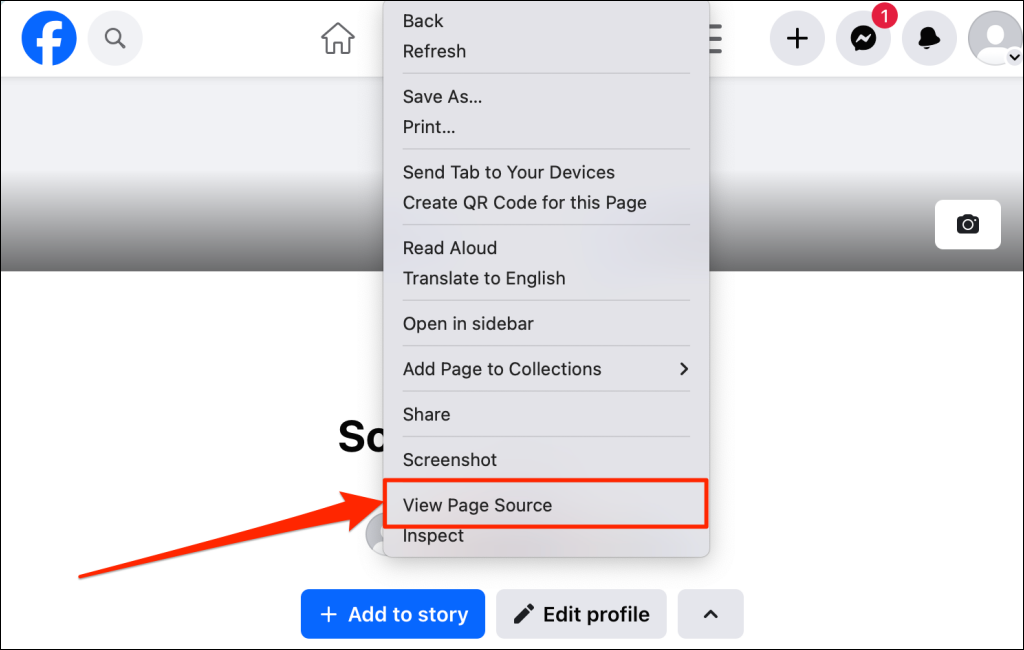
- Right-click anywhere on the page and select View Page Source or Show Page Source.
- Press Control + F on your PC (or Command + F on Mac) to open your browser’s search bar.
- Type buddy_id into the search bar. You should find a bunch of buddy_id’s on the page. Copy a buddy_id and proceed to the next step to see whose profile it points to.
- Open a new tab and enter facebook.com/buddy_id in the address bar (replace buddy_id with each 15-digit profile ID you copied in step #5.
That will open the person’s Facebook profile page. Repeat the steps for all buddy_ids on your profile source code page.
Can Third-Party Apps Really Show Who Has Viewed Your Profile?
Facebook doesn’t allow users to track profile views or visitors, and third-party apps cannot provide such functionality. However, apps like URL shorteners or IP loggers can help to some limited extent—by letting you know where Facebook users who reside with your post reside.
These apps capture the IP address of your Facebook friend or stalker, their device information, and their location. If you think someone you know is stalking your Facebook (profile/activity), you might be able to confirm your assumption using the person’s location.
- Choose a site to share on Facebook, preferrable something your friend or stalker might find funny or interesting.
- Copy the website URL.
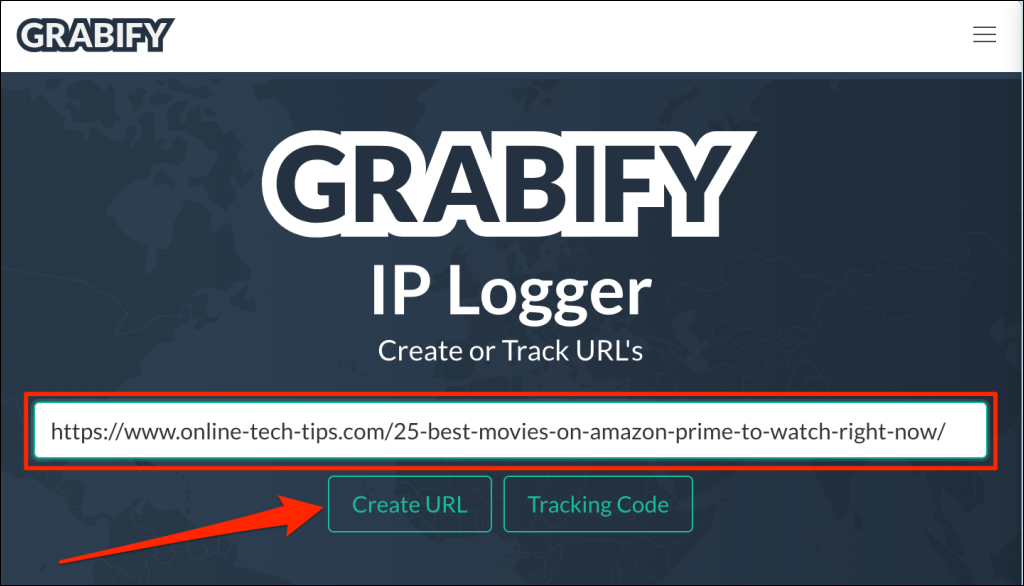
- The next step is to encode the URL using a link-shortening tool like Grabify. Open Grabify (https://grabify.link) in a new tab, paste the URL into the dialog box, and select Create URL.
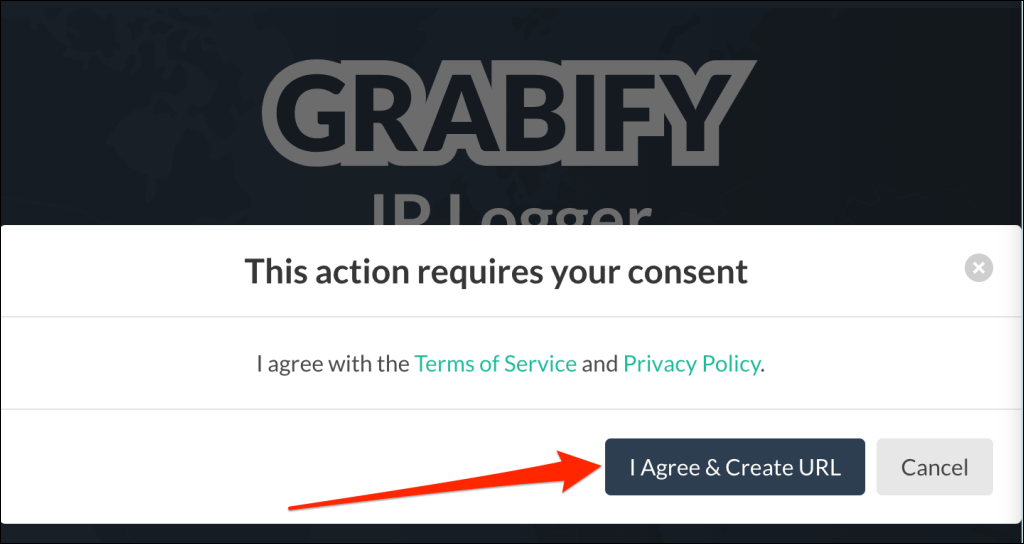
- You’ll see a popup saying, “This action requires your consent.” Select “I agree and create a URL” to proceed.
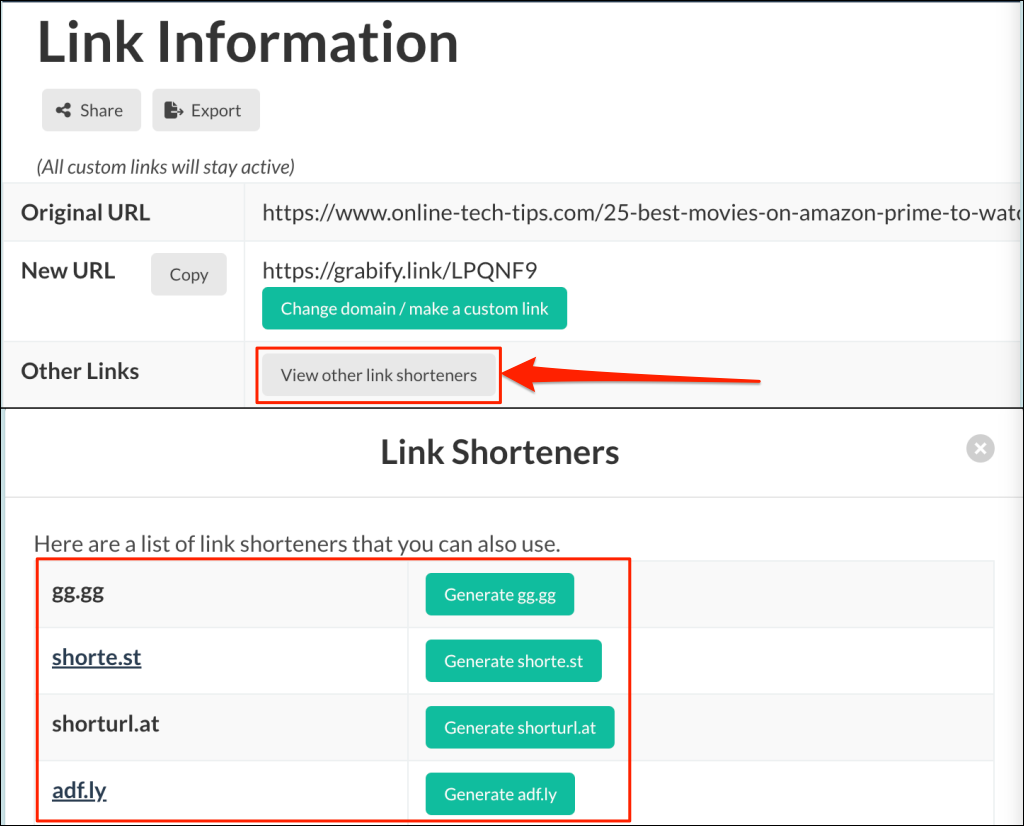
- People may not want to click the link if they see you’re using Grabify, so select View other link shorteners and choose a less obvious URL shortener from the list to hide that you’re using Grabify.
- Copy and share the new shortened URL on Facebook with an interesting caption or description to entice people to click.
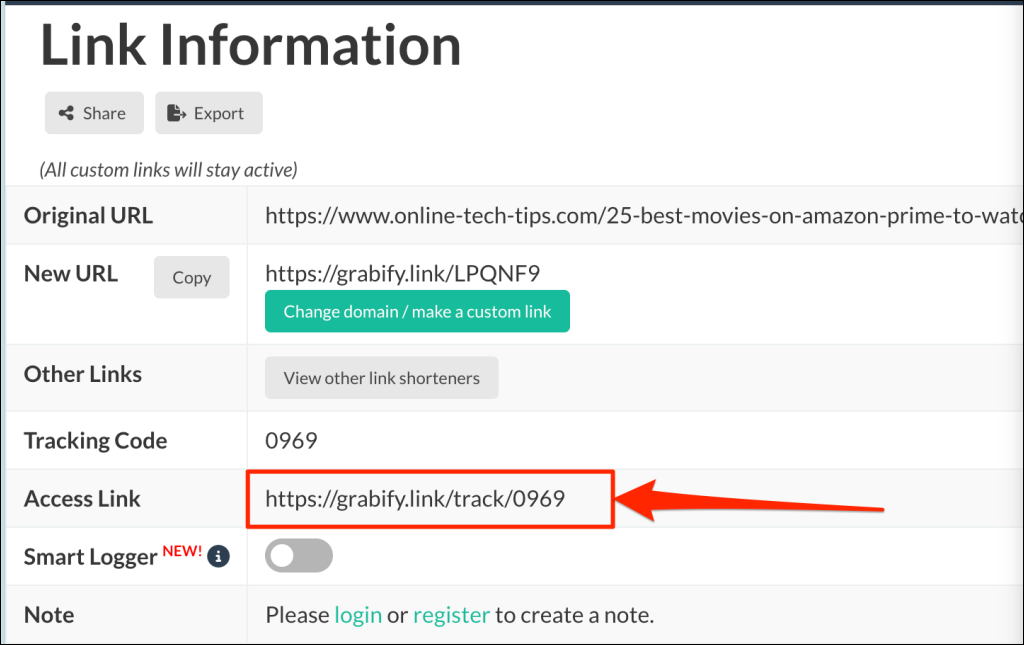
- Be patient and give it some time for people to engage. Use the “Access Link” to monitor the engagement on the link.
When anyone (or the person stalking you on Facebook) clicks the link, Grabify shows you their IP address, location (country and city), device information (model and operating system), and the time/date they clicked the link.
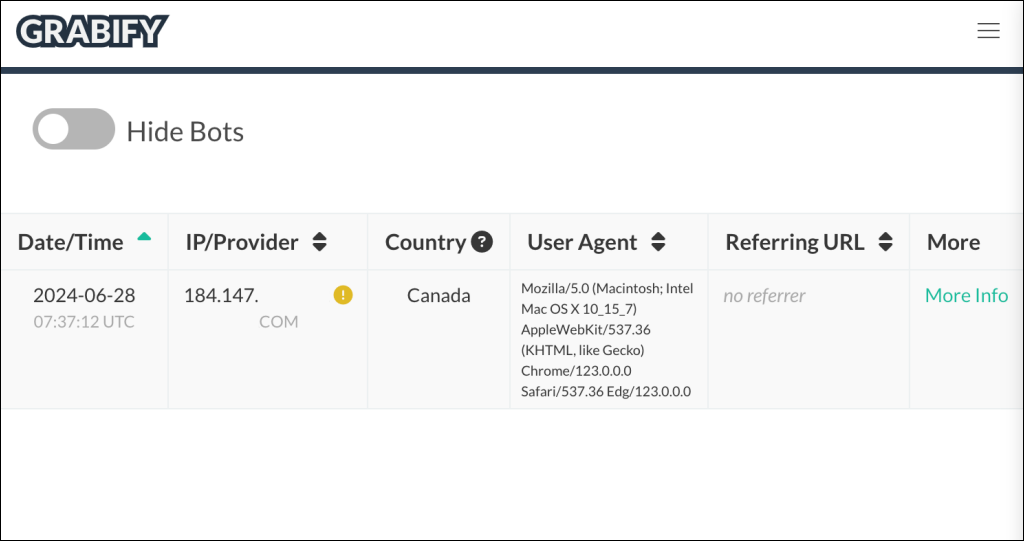
By doing this a few times, you should get an idea of where the people viewing your posts most often are located, which may help you figure out Facebook users stalking your profile. This doesn’t mean that these people necessarily visit/stalk your profile, just that they clicked on a link in your post.
Note: A proxy server or Virtual Private Network (VPN) can spoof the visitor’s location. So, you should only rely on the location in Grabify’s URL tracking report if you’re certain your friend or stalker isn’t using a proxy or VPN.
What About Suggested Friends or Top Friends?
Some people try to deduce Facebook users stalking their accounts from their top friends or friend suggestions. Unfortunately, the “People You May Know” list isn’t based on people who visited your profile. Instead, it’s based on mutual friends in common, your networks, activity, any groups you’re a member of, and so on.
Your top friends list isn’t any help here, either. These are the people you frequently text and whose posts you frequently interact with (like, reply, share, etc.) and vice versa. It doesn’t necessarily mean that they stalk your Facebook page.
How to See Who Is Stalking Your Facebook Profile on the App (iOS/Android)
Things aren’t different on the Facebook app for iOS and Android users. There still isn’t a way to definitively see who’s stalking your profile, though this may be a feature that Facebook introduces someday. You should switch over to alternative social networks if monitoring profile views or visits is important to you. Consider TikTok as it lets you see who (or how many people) viewed your TikTok profile within a 30-day period.
There’s no one solid answer or solution to seeing who is stalking your profile on Facebook. Make sure you avoid third-party applications or sites that promise they can provide you with this information—they could be fishing for your personal information or login details, and they won’t actually be able to show you who’s stalking you on Facebook.
One thing you can do is configure your account to cut out information available to stalkers or strangers. Proceed to the next section to see some ways to protect your Facebook account from stalkers.
How to Protect Yourself from Facebook Stalking

Facebook provides options to dictate who (and who doesn’t) see things you share on the platform. You can protect yourself from stalking by configuring your account visibility and audience settings for better privacy. We’ll show you how to control who sees your Facebook story, post, reels, tagged posts, etc.
Change Post Audience and Visibility Settings
Sharing new content with only your Facebook friends is a good way to stop strangers from stalking your posts.
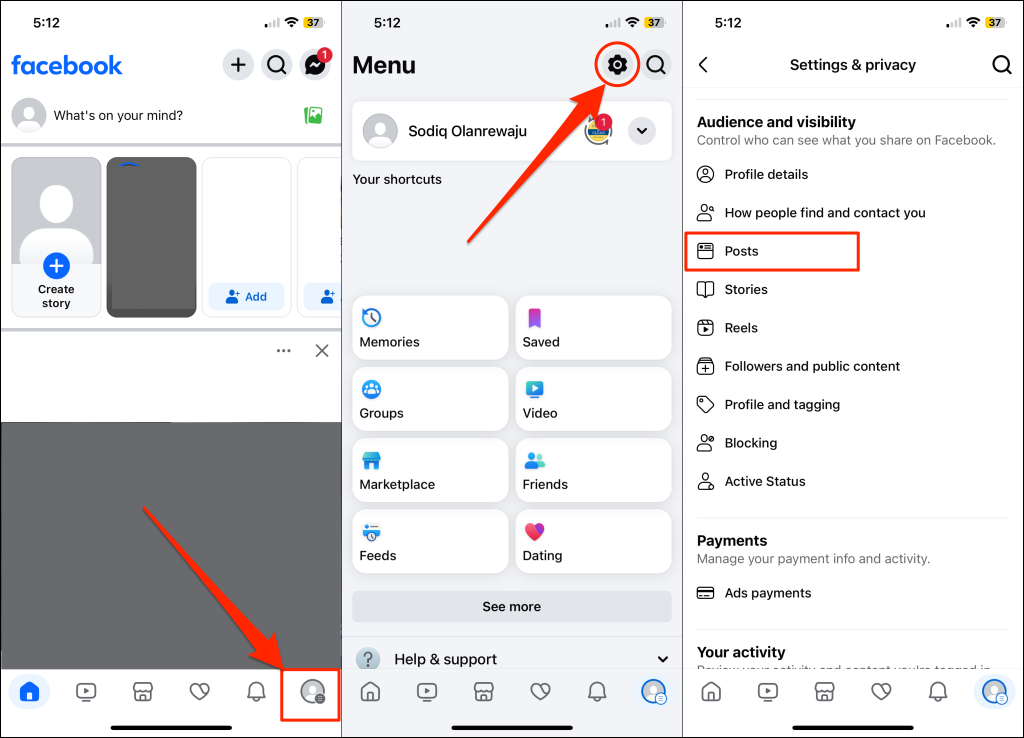
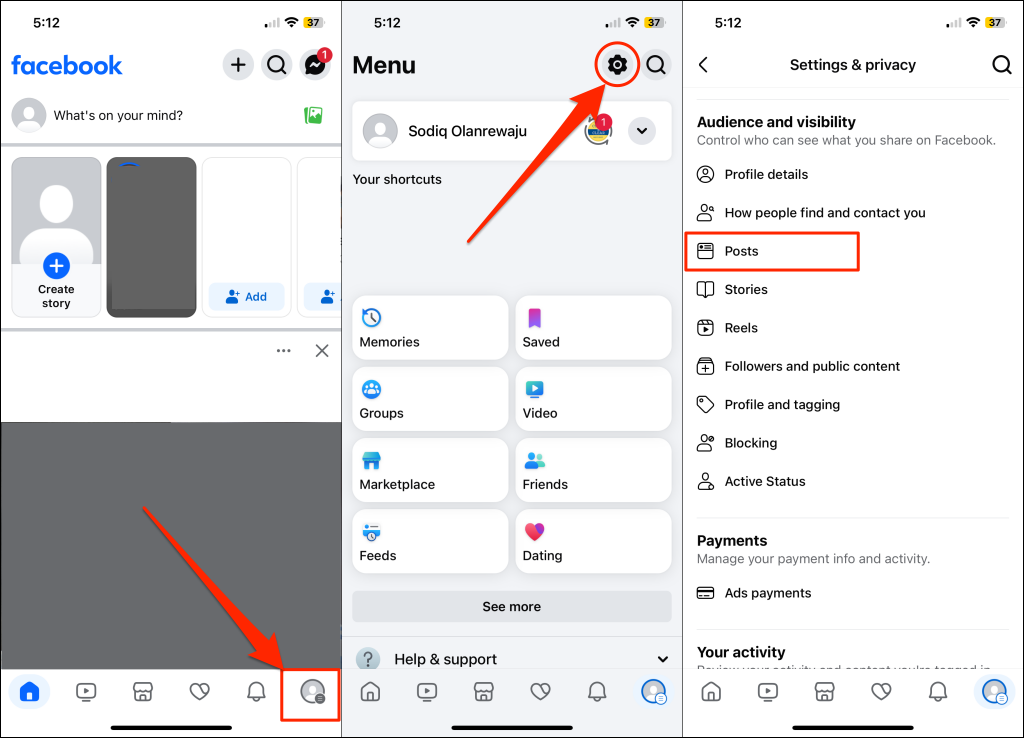
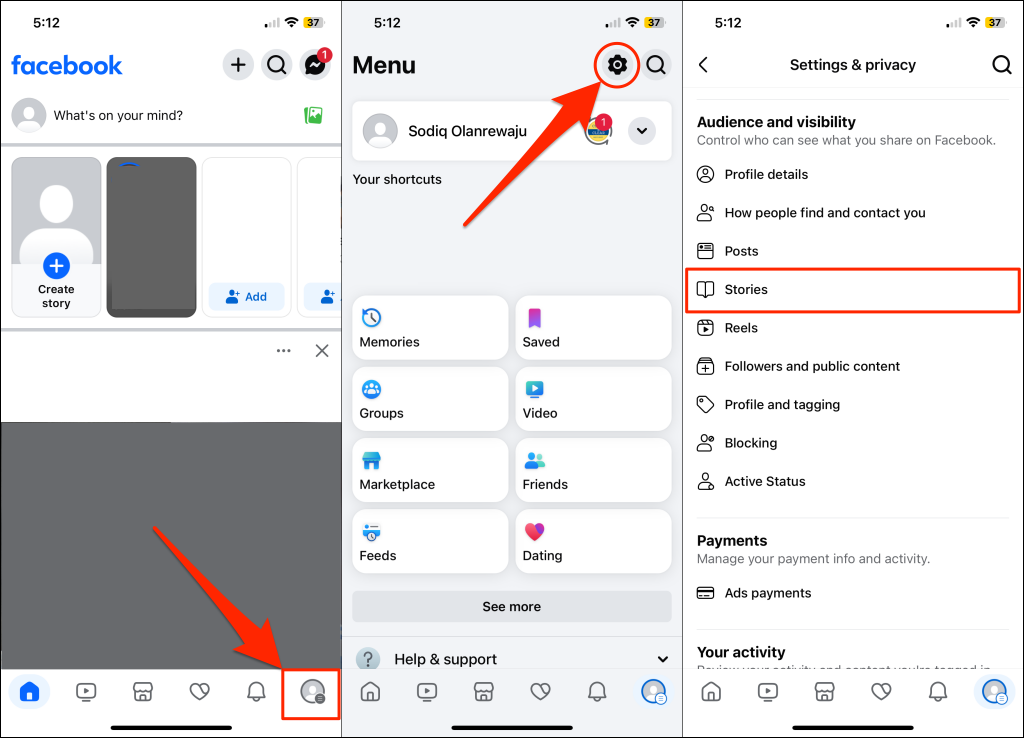
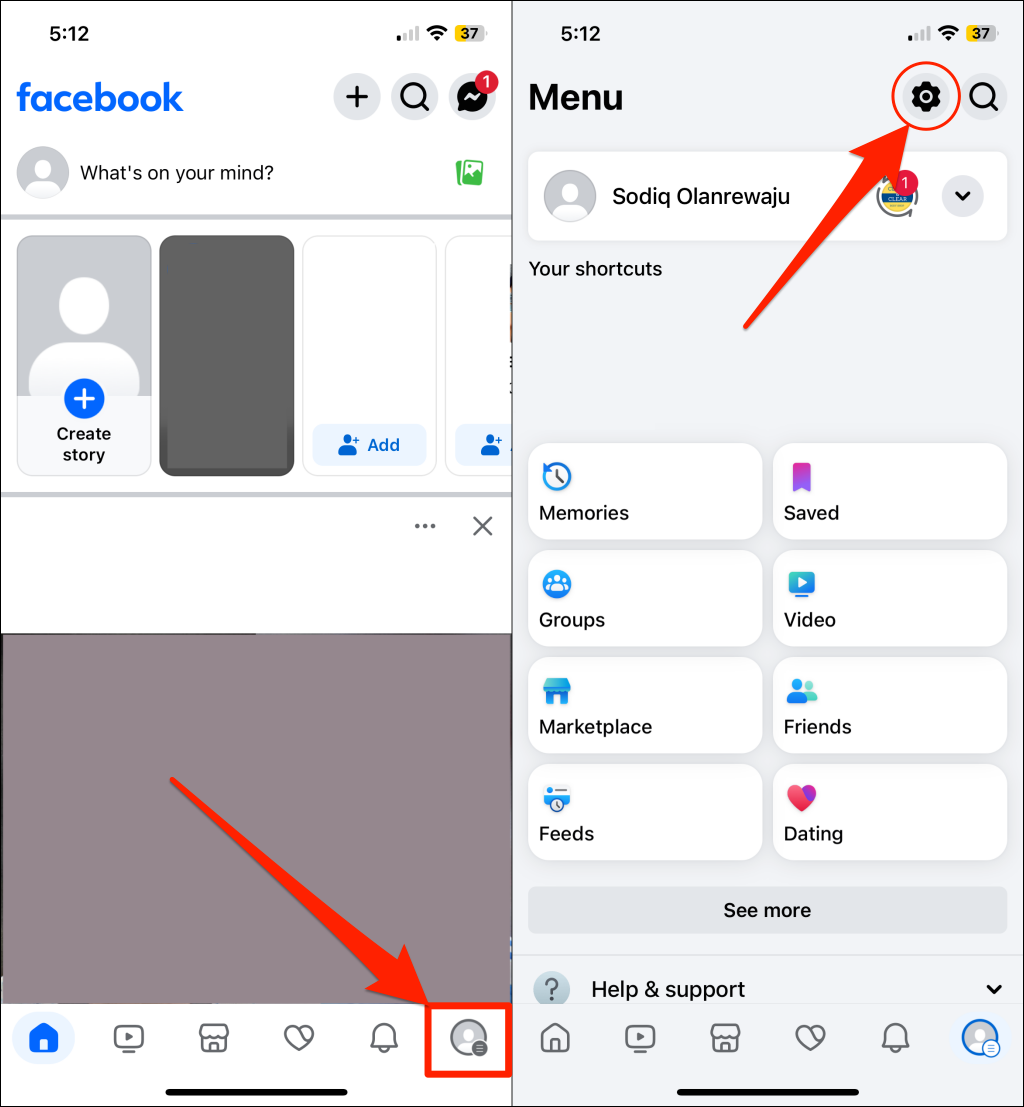
- Open the Facebook app, tap your profile picture, and select the Settings icon in the top-right corner.
- Scroll to the “Audience and visibility” section and select Posts.
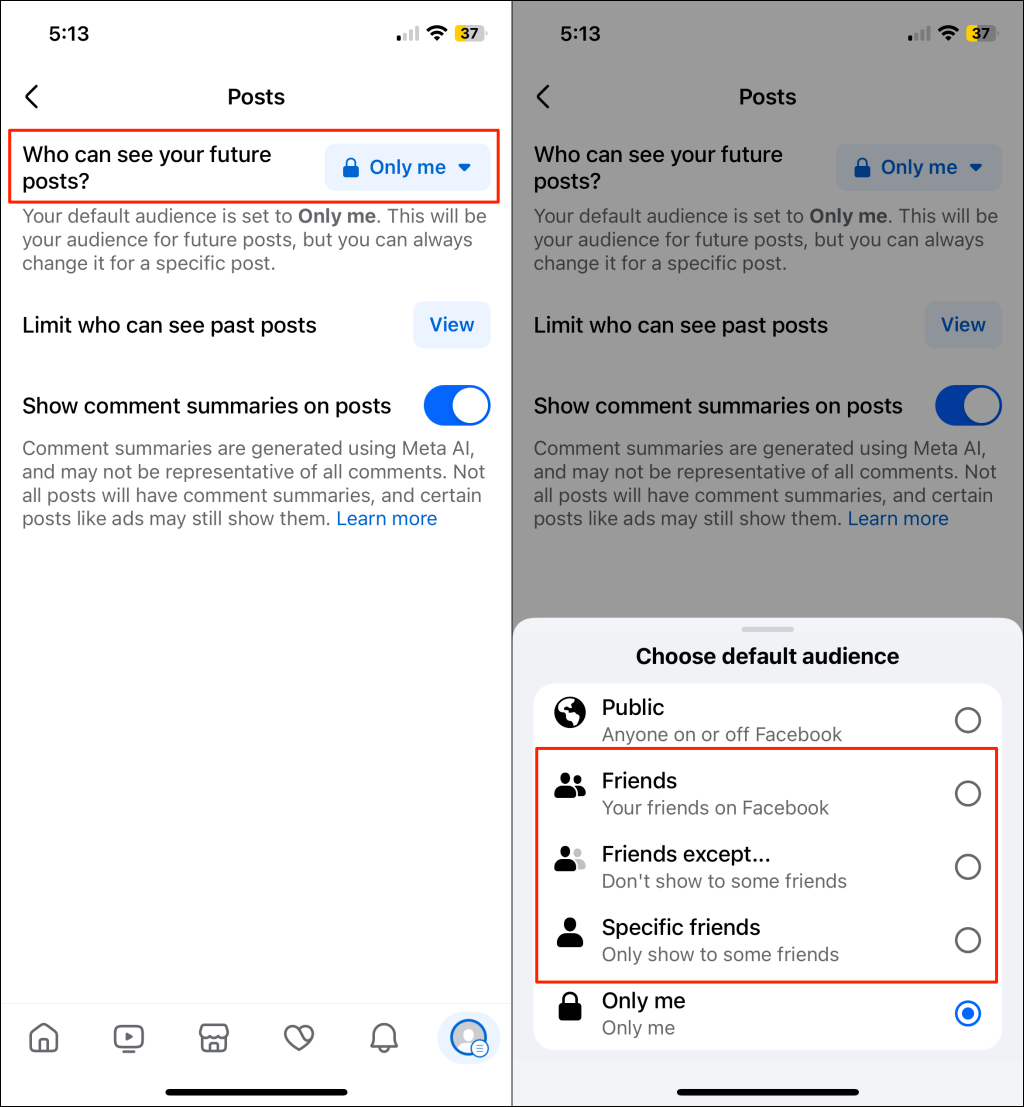
- Open the Who can see your future posts drop-down menu and choose an option that lets you control your post audience—Friends, Friend except, or Specific friends.
Change Visibility Settings for Previous Posts
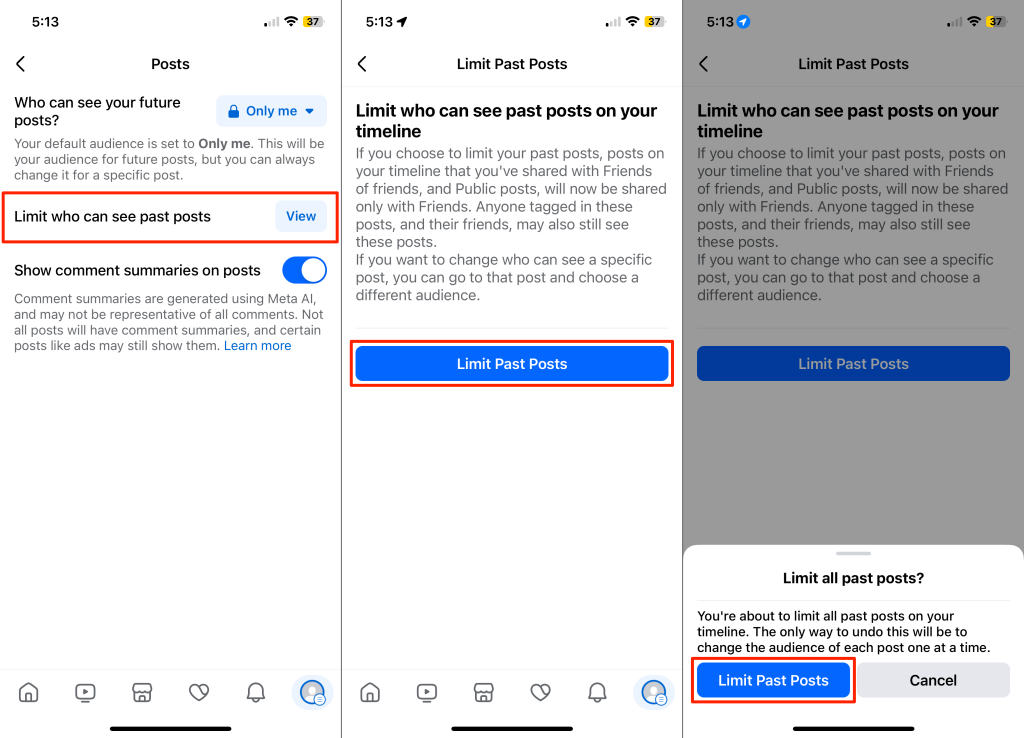
The “Limit Past Posts” option lets you change the visibility and audience settings for all your old posts.
- Open the Facebook app and tap your profile picture.
- Tap the Settings icon in the top-right corner and select Posts in the “Audience and visibility” section.
- Select View > Limit Past Posts > Limit Past Posts to make your previous posts visibile to only your friends.
Note: Once you limit your past posts, there’s no way to make them visible to the public again in one click. You’ll have to individually change the audience/visibility settings for each post. See the next section to learn how to change the audience settings for a single post.
Change Audience and Visibility Settings for a Single Post
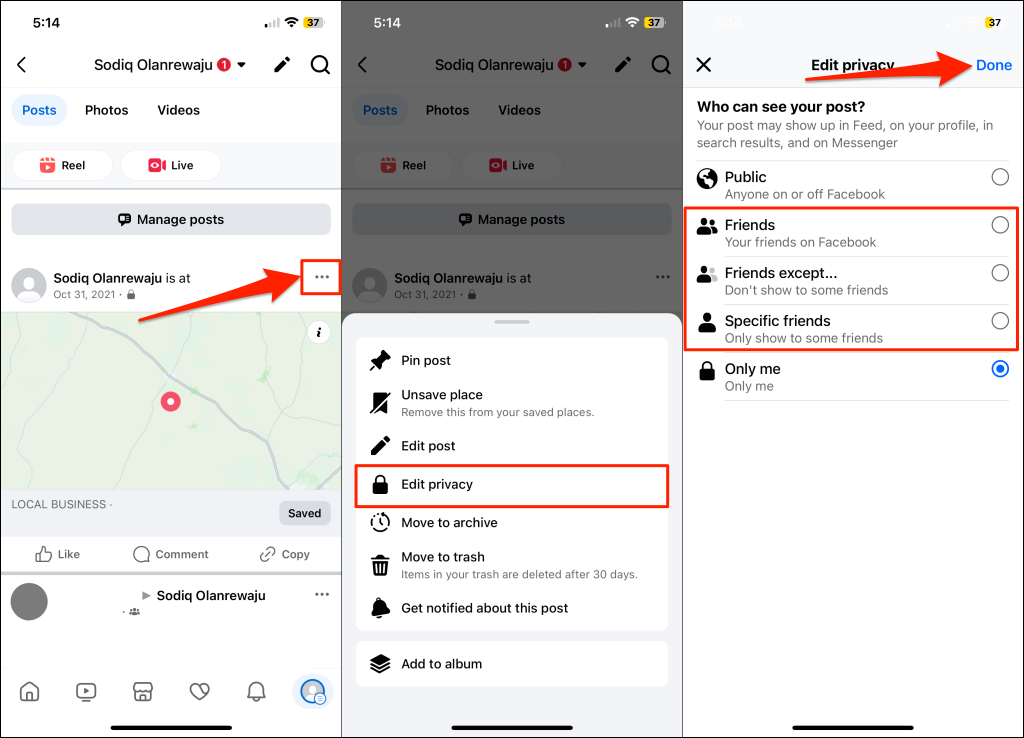
Want to make an old post invisible to a stalker? Locate the post on your profile page and follow these steps.
- Tap the three-dots menu icon in the top-right corner and select Edit privacy.
- Choose your preferred audience option for the specific post and tap Done.
Change Story Visibility and Audience Settings
Sharing stories with people you know can keep your activities hidden from stalkers. Follow the steps below to change your story privacy settings in the Facebook app. The instuctions apply to both Android and iOS users.
- Tap your profile picture, select the Settings icon, and choose Stories in the “Audience and visibility” section.
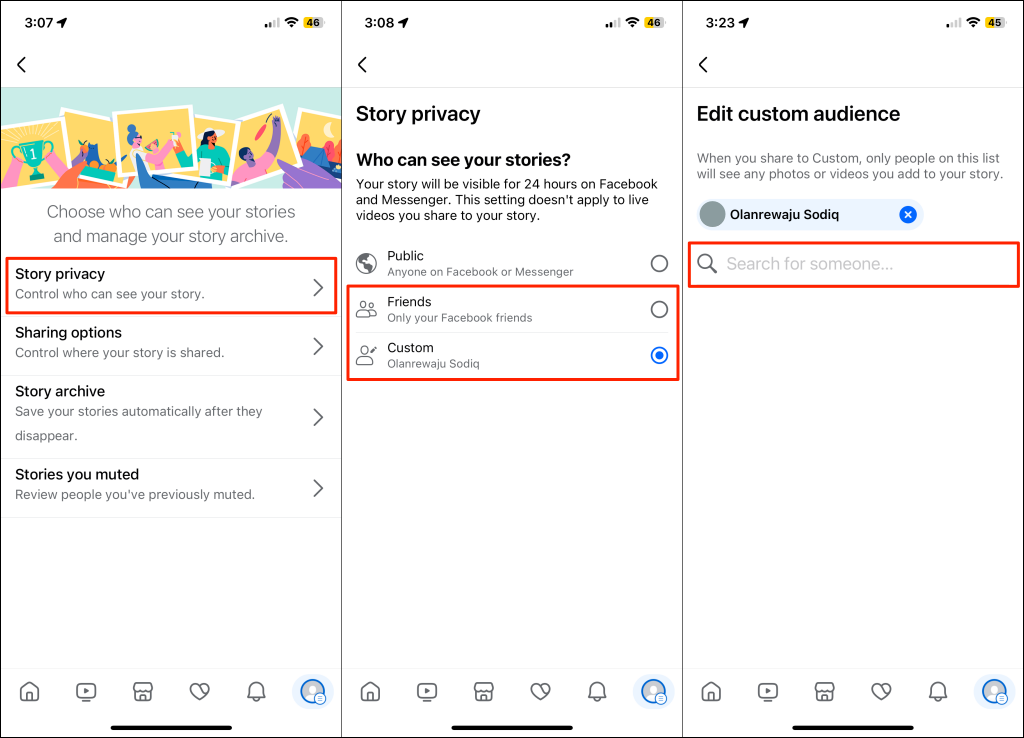
- Select Story privacy and choose Friends to make your stories visible to your friends only. Choose Custom to share stories with a specific Facebook friend(s) or individual(s). Use the search bar to find people you want to view your stories.
Make Your Facebook Account A Little Private
Stalkers sometimes don’t stop with just obsessing over your Facebook post or story. They could stalk Facebook users you’re friends with, pages you follow, or your profile info. One way to prevent this is to make your information available to only your friends or specific people.
- Open Facebook, tap your profile photo, and select the Settings icon.
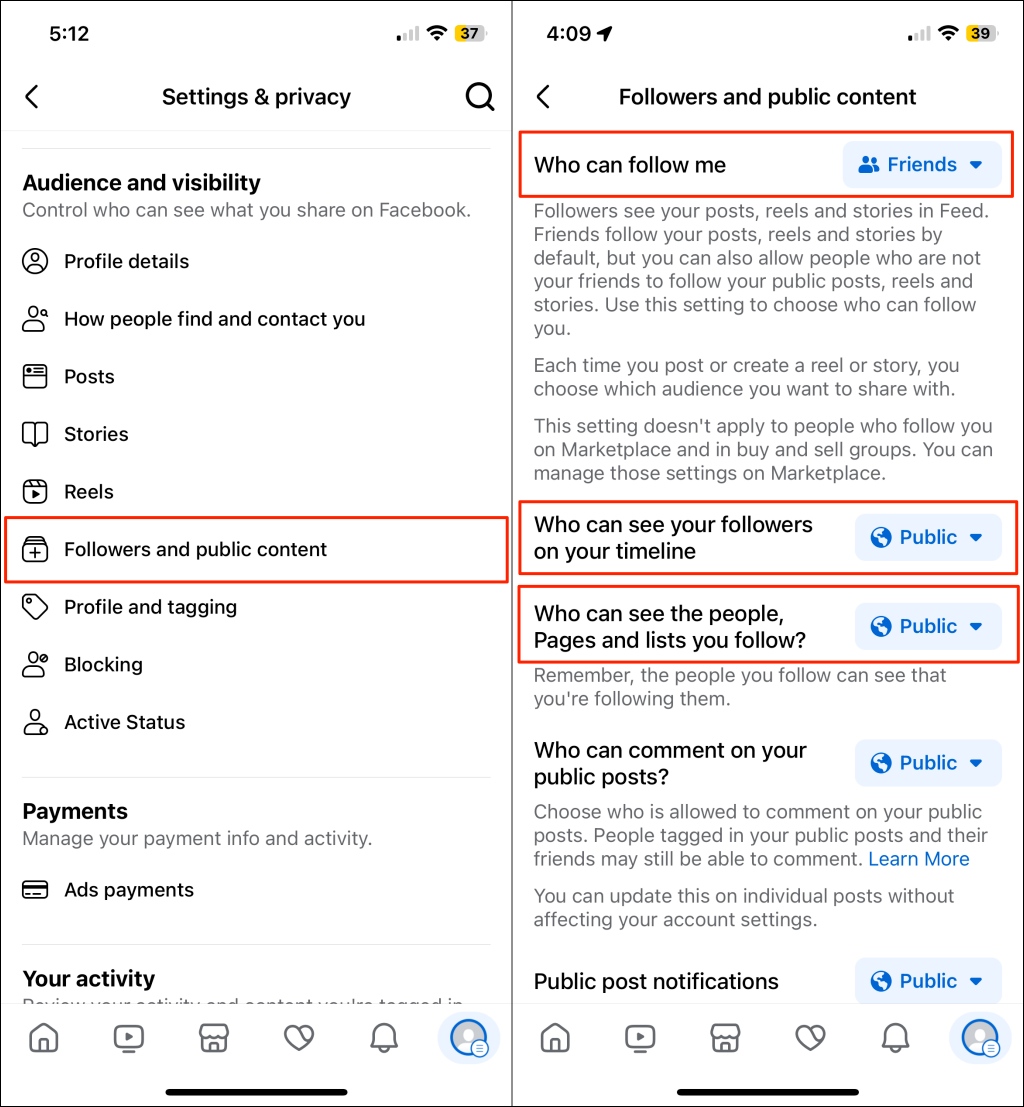
- Select Followers and public content in the “Accessibility and visibility” section. Afterward, set the “Who can follow me” to Friends. We recommend doing the same for “Who can see your followers on your timeline” and “Who can see the people, Page and lists you follow?”
Keep Stalkers at Bay
In addition to the tips above, consider blocking suspicious individuals or accounts you think might be stalking you. You should also hide your online status, limit post tags, and turn off reverse email/number searches. For more information, see our post on improving privacy on Facebook.
